Posts

Showing posts from September, 2021

Art Journal Covers

Image
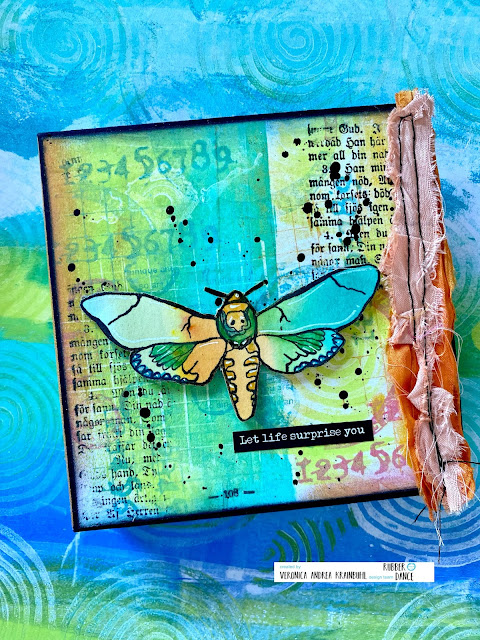
  Hi, I'm Vero (@ Vero.kt) and I welcome you to today's inspiration. How's everybody ? I've been playing with     Mixed media marks   Grungy Stuff   ,   Round in circles   ,     I nky Friends  and    Old book page   to create the covers for my new  Art Journal  , that I hope you like. I started by lining two cardboard lids of a cookie box in black card stock and the spine with a binding cloth.A few days before, prepare several backgrounds with the Gelli plate and acrylic paints Cut to the size of the covers, and I started stamping different stamps with Oxide inks in shades similar to acrylics. I choose one of the stamps from the  set,   I nky Friends  stamp, color it with watercolor pencils, then cut. One of the parts that I enjoy the most is the composition, I have to admit that it is  usually the part that takes me the most. Now I leave you some photos with details of the project.I hope you like it as much as I do when making them. Here are the Rubber Dande Stamps I u

Simple Layered Stamping by Gail

Image
Hello Rubber Dance friends.  Gail here today and I have been simply playing with my stamps and colours today to make some pretty, easy cards.     I used stamps from Rubber Dance Carved Collection 3 , Sketchy Birds and Pencil Marks 1 with distress ink colours and a little black and brown archival ink. I started with an A4 sheet of pale grey card and stamped the Circle all over.  I used Scattered Straw on the right hand side, but switched to Tea Dye on the left.  I inked the stamp and stamped it twice each time before re-inking.  I stamped the Feather all over the sheet using Spiced Marmalade ink Then I took the small leaf cluster and stamped it in two shades of pink.  If you look in the top left hand corner I started with brown shades and didn't like the look.  If you aren't sure, do a colour trial in a corner to check your choices.  I thought I would be cutting that bit off the sheet, but in the end it became a useful design point, so you never know.  There are no mistake

Altered Book Page by Angie Coomber

Image
Hello arty friends, Angie here and today I have an altered book page for you.  I would normally work in the actually book, but I pulled a page out this time to make it easier to photograph for this tutorial. I coloured the page by swiping Distress Oxide on my craft mat, spritzing with water and then mopping up with the book page. I stamped/embossed the moon from the Night & Day set on a piece of gelli print and cut it out, Then stamped the girl from the What a girl wants set and coloured her in with water colours. Next I gold embossed some stars on the book page. I glued all the elements to the page, adding some punched out stars and washi tape.  Finally I added some shading and doodling. Now I just have to glue it all back into my book! Until next time! Hugs from Angie x Stamps used: What a girl wants Night & Day

The Textured Birds Love Flowers by Dot Leathbridge

Image
Hi everyone, Today I've made a card for you using the colours from our monthly mood board. Here are a couple of pictures taken along the way. I started with the stamping. I wanted to have the Textured Bird poking through the ring from Floral Wreath. It required some careful thinking on how to do it. In the end I needed to use a stamping platform, stamp the  bottom half of the wreath, mask it off, stamp the bird, mask it off  and then restamp the wreath in it's entirity. Then it was time to colour it in. The colours are from our mood board this month. Here are some close ups. Extra flowers have been added with more masking. Extra elements form Floral Wreath have been added just for fun. It's surprising how many extra little bits are in this set! And a few splatters here and there to finish it off. I hope you enjoyed this card. The stamps used on this card are: Floral Wreath Textured Birds Here is the mood board. I hope that it gives you some inspiration  for your crafting.

Happy Red Roses Card with Farida

Image
Hello lovlies, Farida here. I am happy to be back on the blog again.  I always have so much fun colouring images. This time I grabbed this large flower stamp from the Sketchy Flower #2 stamp set, my new no line colouring ink pad and a bunch of alcohol markers.  It's so calming to just colour in the stamped images.  For the background I used a slightly blue greyish cardstock and the same no line colouring ink pad. For the background I wanted to go with just some shaded areas, that why I used a very light grey alcohol marker to just colour in some shades.  I assembled the card by cutting out the coloured flower image leaving a white border around it and added some foam tape behind it. The monochrome background is matted with some silver mirror card stock. Finally I added the Happy Birthday sentiment from the same stamp set ( Sketchy Flowers #2 ) matted on the same silver mirror cardstock. Et voila a next "Happy Birthday" card is ready. I hope I could inspire you with

Flowers Gone Wild Collage Cards by Ellie Knol

Image
I created an A5 sized background onto watercolor paper with sprayinks to be able to create these two cards.    Stamping the images with a black ...  ... heat embossing with clear embossing, ..  ... and decolorizing the images with bleach, makes the images pop.  Adding background stamped images and script, tiny bits of color to the flowers, and white accents (acrylic marker and white splatters) finishes them off.  Have a good day, maybe a creative one?  Of course I'd like to hear from you whether you like my post, and furthermore: how you got inspired maybe? Thanks, appreciated. See you, Ellie Knol.    Rubber Dance Stamps: The Rubber Dance Webshop Flowers Gone Wild Art Defined Mixed Media Marks Grungy Sequins