Posts

Showing posts from March, 2019

April Stamp Release - New Stamps are 10% off

Image
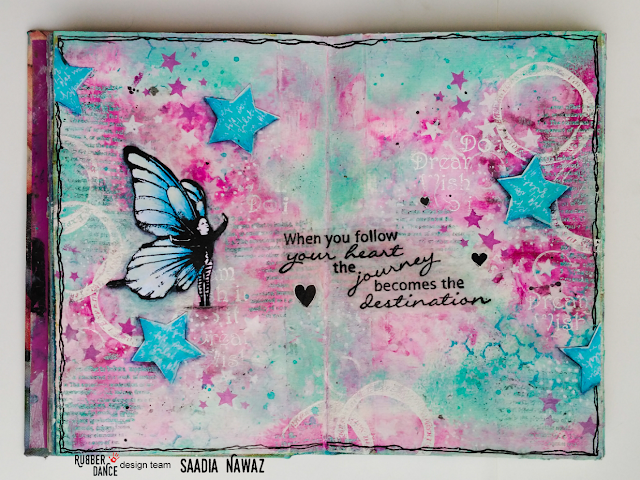
Hello my dear crafty friends! It is time for a new stamp release!!! We had some flowers and mixed media stamps last time, so I thought, that we need some creatures to add to the flowers this time! The new sets are perfect to create Spring or Summer themed project, but my opinion is: Butterflies are timeless! All new sets, we have four, are available for preorder  with 10% off right now in the store.  The new stamps start shipping on April 10th . Let me show you the new sets! Butterflies are my go to images when I create cards, tags or art journal pages! I wanted to have some that match perfectly with our new grungy line. Here is our new big set, Grungy Butterflies: .  These butterflies are comparatively big, so I decided to also make a small set out of them. With the two different sizes you have many options to combine them. . These are our Small Grungy Butterflies: I am happy to say that Melina Dahl also made some wonderful drawings

Easter Card, Distress Oxides and Crayons, Dot

Image
Hi everyone, Dot here.  Today I've made an Easter card for you.  Easter seems to be sneaking up on us so I thought it might be nice to use some eggs. The eggs, swirls and spots are from ' Gather Together ' stamp set and the  feather is from the 'Birdies' set. The background was simply made by swiping card through Distress Oxide ink's on a craft sheet. Some stamping with oxides and a little white gel pen to finish off with. The eggs on the other hand are stamped with Distress Crayons! This is a super fun way to stamp and these eggs were ideal for this technique. Here is a closer look at the eggs. I chose to use 3 shades of blue crayons and then around the edge I added some dark brown crayon. They've been left plain because to me they looked beautiful just the way they are. The Gather Together stamp set took me by surprise when I had a real close look at it. The flourish is absolutely GORGEOUS! And there are s

A Big Day for Mama Owl

Image
Hi Everyone, Cornelia here today, having fun playing with my new Rubber Dance stamps! My stamp supplies: Mama Owl This card evolved, if I may say so.....I started out with the owl on Kraft card stock and colored it with Inktense pencils. I then ruined my card, with making a grey outline around the owl. Looked hideous.... I then fussy cut the owl and found her a new background paper. I thought it needed something else, so I heat embossed the florals before I glued the owl to the background. I added white gel pen accents to the owl. Die cut the sentiment twice and mounted it to the card. I finally was happy with the result. Hope you like it, too. Don't forget our challenge is still going for a few more days, until the end of the month. Play along, if you find time! It runs all month long over in the  Facebook Rubber Dance Stamping Lounge  and its those three colors you see below and/or anything goes with Rubber Dance stamps. Happy Rubbe

Single violinist

Image
Hello Henriette here today. It is my turn again to show you the beautiful Rubber Dance stamps.  I have worked on CANON gloss photo paper with the  background stamps f rom the Textured Feathers stamp set using orange, yellow, green, blue and pink Distress Ink.  I stamped the Violinist on it, cut her out and used    black embossing powder around the edges.  Then I matted  on yellow and turquoise cardboard. Have fun making this card. Henriette

A journal spread tutorial with Butterfly girl by Saadia Nawaz

Image
Hi Everyone Saadia here. I want to share with you an art journal spread today. Let's start our journal spread. Step 1: I applied a coat of white gesso to my journal pages. Gesso prepares the surface for acrylic paints. Step 2: I applied Acrylic paints with my fingers and a make up sponge. I applied layers until I was happy with the result. Step 3: Next, I did a bit of background stamping with Art defined, Grungy stuff and Think again stamp sets. I also heat embossed the circles from Grungy stuff samp set at the edges of my spread. Step 4: I stamped my Butterfly girl #2 on a white cardstock. I colored her with watercolor pencils. After that I fussy cut her and glued her on to my page. I also stamped and fussy cut stars from Grungy stuff stamp set Step 5: I stamped the sentiment from Think again stamp set onto my page. Step 6: Added a bit of highlights with white Gelly roll pen and shadows with a charcoal pencil. That's all for now

Happy Flowers ► Majo

Image
Good morning, crafty friends. Spring is finally here, so I decided to create a card for all occasions using Textured Flowers and a sentiment from the YOU ROCK set. I started by stamping a whole bunch of flowers and leaves and coloured them with Distress Spray stain.  I wanted more delicate leaves as well, so I just drew them on a piece of water color paper and fussy cut some. After cutting my jar (it's a Memory Box die) I assembled all my images, added some linen thread and a Rub On from Tim Holtz. I used the beautiful sentiment from the YOU ROCK on the inside. This looks like it's a lot of work, but I always have a bunch of flowers stamped and cut. So when I need a rather quick card, all I have to do is color them according to the occasion and I'm all set. Here are some close ups:        .... and also the inside of my card .... I used the following stamps: YOU ROCK    Textured Flowers   Please visit our