Posts

Showing posts from October, 2022

Mixed Media bookmark by Lisa

Image
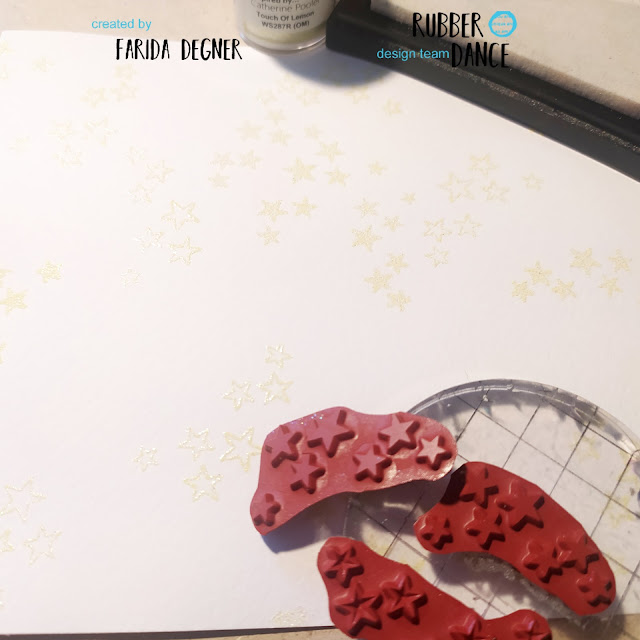
 Hi dear friends! Lisa today with you to share my new project with some awesome Rubber Dance stamps! To start I used some watercolors for the background. So I chose Grungy Stuff stamp set and I stamped some stars with red archival ink. I stamped some flowers on a patterned paper with Inky Flowers stamp set and I used them as my focal point. Finally I added a little title for my bookmark and I made some splatters with liquid paint. I used these products from the shop: https://www.rubberdance.de/big-sheets/inky-flowers/#cc-m-product-14383087433 https://www.rubberdance.de/small-sheets/grungy-stuff/#cc-m-product-14004441033 I hope you enjoyed my project for you! Hugs, Lisa 

Celestial Book Marks or Long Task by Farida

Image
 Hello lovlies, I got some new stamps to welcome at my stash...the amazing Celestial Stamp Set . So I really need to use them in my newest project. As i somehow connect them with a mystic theme, I felt like creating some bookmarks. Because as reading books is like travelling into other worlds/spheres.... :) Okay I am going to drift away....back to my book marks project. I started with stamping some of the stars using a watermark stamp pad and an heat embossing powder on a large piece of mixed media paper.  After heat embossing it, I used my watercolours to create a night sky. Primary I used black, dark blue and a violet colour.  Turn this backround into book marks I cutted them down to size and used a corner chomper wo round the edges and added a hole at the top of each of the three pieces.  And finally it's time to use the suns and moons....yay...therefor I stamped them all, again using some heat embossing powder. As the base cardstock I used a grasspaper, because I really like th

"Find Beauty" Art Journal Page Angie Coomber

Image
Hello arty friends, how are you doing? I have not done any proper art journaling for ages and remembered that I really liked these circle design pages so decided to have a play with some autumn colours. I started by clear embossing some circles on my page. Next I very lightly sketched a circle on my page and followed this up with my Distress Crayons. I usually draw my lines and then smudge them with my fingers, using a bit of water. I used the same colour crayons to add some mark making. I thought the marks looked a bit harsh so smudged them a little. The next step was to add some stamping using black Archival ink, as well as some magenta paint  splatter and marks made with a gift card . I added some white mark making to make the colours pop a bit more. I stamped my focal image onto a piece of gelli print, cut it out and glued it onto the page, together with a quote. I have to tell you that I wasn't very happy with this page at the beginning, but often it's worth persevering an

Pencil Marks Tag

Image
  Hi, I'm Vero (@ Vero.kt) and I welcome you to today's inspiration. How's everybody ? I've been playing  with   Mix it up 2   ,   Mix it up 1   ,  Mix a sentiment 3   and   Pencil Marks  6     to  create a Tag   that I hope you like . On watercolor paper, I play with different spray inks to create a colorful layer and use a blow dryer to speed up the process. I choose a stencil and apply micro distress glaze (this medium is waterproof, so the surfaces you apply it to won't be affected by water. You can use it as a resist when applying watercolors or any water-based paint or ink) .) I use a dryer to speed up the process and to add interest and depth to the page, I stamp different stamps with permanent ink . One of the parts that I enjoy the most is the composition, I have to admit that it is  usually the part that takes me the most. A few splashes with white acrylic and we would have our page. Now I leave you some photos with details of the project.I hope you like i

Autumn ATC cards with Pencil Marks #3 by Mariken

Image
                                                                                                                                                           Hi there!  Mariken here, with a tutorial for you, making these Autumn ATC cards, with these beautiful stamps!                                                                                I used: Pencil Marks #3 I had a left-over from a gelliprint,  and added some marks with white embossing powder.   After that I stamped the leaves with black ink    and  colored them with Ecoline brush pens.                                                                   Love the bright colors!                                                                                                                                              I glued the leaves on the cards, and there you are,                                                                 two sweet Autum cards...                                                                    The stamp

Bookmark "Lion Around"

Image
    Hello friends!! Josi Tomàs (@elbauldegiulietta) greets you again.  Today I want to show a new easy tutorial which I made using scraps of papers from a previous project. Do you also take advantage of pretty things? I hope so!!   It's very easy to do. I create a quick background using the leftover paper scrap from the previous tutorial combined with book paper splattered with black acrylic paint.  Click on the image to see the previous tutorial...    Once the composition is finished, I have reduced the intensity of the color by applying a very thin layer of white paint whit my fingers in some areas.  Next, I have added some black and white circle stickers and I have reviewed them with a marker. Secondly I have stamped the lion directyl on the background.   I have given the final touch with a ribbon attached to a white wooden ball and stapled on the top edge and the phrase "lion around" decorated with the same ribbon.    I hope you like it! Big hugs, Josi  Here are the

Mixed Media Background Collage Cards by Ellie Knol

Image
  For today's post I created four Mixed Media Background Collage Cards! I created a masterboard with collaging different elements to a piece of paper that measured 30 by 30 centimeters approximately. The  HOW TO : Adhere elements like fussycut stamped images (flowers and leaves), but also book paper and some colored imagery (mostly green leaves).   Stamp with Mixed Media or flower stamps in the background. Apply gesso over the elements partially with a palette knife using gesso.  Spray with green and orange spray inks to merge all the of elements to a cohesive background.  Tear four pieces from this masterboard to fit the four card bases.   Adhere fussycut stamped images, stamp postage stamps and fussycut stamped torn pieces of postage tickets to finish each card off.   See you next time!  Rubber Dance Stamps: The Rubber Dance Webshop Mixed Media Marks #3  Grungy Butterflies Textured Birds Flowers Gone Wild Textured Mushrooms Mix A Sentiment 1