Posts

Showing posts from July, 2019

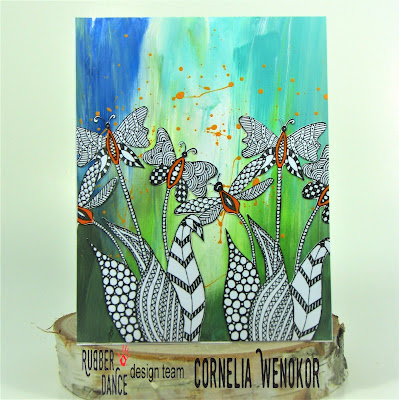
Grungy Rainbow Butterflies with Cornelia

Image
Hi Everyone, Cornelia here today. I always need some cards just to send out for no good reason or just a little picker upper.   Grungy Butterflies  from Rubber Dance will lift everyone's spirits! My stamp supplies: Grungy Butterflies I stamped the butterflies and wet them generously with water. Took Dylusion sprays and dabbed color onto the wet butterflies. Took a spray and sprayed them with water and let the water run down the card.The sentiment die is by STAMPlorations. Don't forget about our challenge, which goes until the end of the month. Play along, if you find time! You'll find it in the  Facebook Rubber Dance Stamping Lounge  and its those three colors you see below or anything goes with Rubber Dance stamps. Happy Rubber Dancing!

Art Journaling *Find your destination* ► Majo

Image
Hello Rubber Dance fans.   Majo here today with an Art Journal page using the lovely new stamps from the Rubber Dance Doodle Borders #1 and #2 sets. The butterfly and the sentiment are from the set Grungy Butterflies .      I started by stamping the border with black Archival ink by Ranger and added borders and more borders until I was satisfied with the coverage. Ok, I went just a bit wild, but I like the outcome. It looks like my butterfly is just coming out of a huge flower bed. For a bit more texture, I randomly added a stamp from the set Crazy Flowers #2 in Distress Oxide *Broken China* from Ranger. I stamped the butterfly twice, once on the journal and then on a piece of scrap paper which I colored with the same inks I used before. I fuzzy cut and glued it to my page. I stamped my sentiment and adhered it with pop dots to the journal. I list the stamps I used for you again: Doodle Borders #1 Doodle Borders #2 Crazy Flowers Grungy Butt

A mini canvas tutorial with Beautiful bugs by Saadia Nawaz

Image
Hi everyone, Saadia here with a quick and easy mini canvas project. I hope you like it. I have used a 4x 4 inches round canvas for this project. I bought it locally from a craft store.  I made the background with Dylusions ink sprays. After that, I did background stamping with  Art defined stamp set . I used Archival inks. Did a bit of heat embossing with  Grungy stuff stamp set . Next, I glued a diecut with gel medium. Stamped and colored a small bee from  Beautiful bugs stamp set  and added a word 'Dream' from  Art defined stamp set . That's all for now. A reminder that we have a challenge that goes all month on our face book page which you can find  Here It is always ANYTHING GOES/ or a colour combo if you wish Thank you for visiting, Take care, Saadia Nawaz. Products used:

Art Journal Page with grungy borders & Distress oxide Spray Ink Swipe with Video Tutorial by Gerry

Image
Hi lovely Rubber Dance fans, it's Gerry on the blog today with another page for my mini album with  R ubber Dance Grungy borders and a fun technique with Distress Oxide Ink Sprays. I used nice bright colours for the background with a hint of the fossilized amber spray. I use the stamps from the Grungy Borders set to make a pattern a border and a focal point. I added one star and sentiment with foam tape for extra dimension. And here is a video tutorial for you. Have fun watching! T hanks for stopping by! Gerry van der Velden Rubber Dance Grungy Stuff Nuvo - Media Spatulas - 2 Pack New Distress Oxide Ink spray – cracked pistachio, mowed lawn, peacock feather, fossilized amber Tsukineko Versafine ink – onyx black Craft Perfect - Ultra Smooth Card- White - 8.5" x 11" (5/PK) Nuvo embossing powder - glacier white clear embossing ink

Today I choose to be happy by Evelyn

Image
Hello lovely Rubber Dancer, it´s Evelyn  here today! This time I want to share a little tag with you. I had a little play with my homemade Gelli plate. So for the background I brayered acrylic paint on my Gelli plate and stamped some of the leaves from the Twiggy Leaves stampset in the wet paint. Then I printed it to the tag. I love how it turned out! Next I stamped the Mix a Sentiment stamp with Library Green and Jet Black Archival Ink randomly to the background, also some of the Grungy Borders. Now I only had to stamp, color and fuzzy cut the small leaves from the Twiggy Leaves stamp set, the lovely ladybug from the Things with Wings stamp set and the sentiment from the Think Again stamp set. I glued down everything with Matte Medium. Lastly I shaded everything with black charcoal, added some dots with a pearl pen and a ribbon. Here are some close ups: Rubber Dance Stamps I used: Mix a Sentiment Things with Wings   Think Again Twiggy

Antique Botanicals Card by Dot

Image
Hi everyone, I hope everyone is well and enjoying whatever the season is where ever you live. Today I've got a quick card for you using the Antique Botanicals set of stamps. This set has so many different stylish elements in it.  It is one of those sets that is a real classic! I had the idea of having a half circle that was shaded in with ink and having butterflies flying out of the open part of the circle.  The circle was die-cut and I used the inside space for my work.   The first thing that I did was to stamp the butterfly inside the circle and mask it off. Flowers from the Antique Botonicals set were stamped with Distress oxides, along with a little stenciling and inking. In my usual clumsy way, I had a couple of smudge marks. How does the black ink always seem to end up on my fingers??? (shaking my head!). I covered the marks up with a some blending of ink around the edges. It did the trick! The flowers on the edge looked a li

Bold and Beautiful Card by Gail

Image
Hello Rubber Dance fans.  Gail here today with a quick and easy floral card using the lovely flowers from Rubber Dance Bold and Beautiful set.   I've went with the current challenge colours and used Red Carnation and Bluebird archival inks for the stamping.  I took the large poppy stamp from the Bold and Beautiful set and stamped it with the Red Carnation ink.  I stamped twice without reinking, so-called second generation stamping, to vary the intensity of the images.  When the ink was dry I repeated with the Bluebird ink, sometimes overlapping the images, sometimes not.  Then using a cotton bud I smudged Cracked Pistachio distress ink into open areas around the flowers.  When the ink was dry I stamped and embossed the large greeting from the Happy Birthday set.  A dark blue mat and mounted on a green card base and done!!!  Join the fun with our monthly challenges which are now based in our FB fan group.  The colours for the June challenge are Dark Red, Pruss

Fly-Fly Flower Tutorial with Cornelia

Image
Hi Everyone, Cornelia here today. I recently got this gorgeous stamp called  Fly-Fly flowers  from Rubber Dance. It needed to go on a card. My stamp supplies: Fly-Fly flowers And that's how I did it: I stamped the flowers twice and cut them with my Scan'N Cut. Added some drops of cheap Acrylic paint (from Michaels) onto thick card stock smeared it with my fingers and let it dry. Splattered orange acrylic paint onto my panel and let it dry again. Glued the flowers onto the card base. I thought it needed some more pop of color, so I took an orange marker and colored the butterfly bodies with it. Looked much better. I decided to not use a sentiment. I don't think it really needs one. Don't forget about our challenge, which goes until the end of the month. Play along, if you find time! You'll find it in the  Facebook Rubber Dance Stamping Lounge  and its those three colors you see below or anyt

Happy Birthday Card ► Majo

Image
Hi Everyone, it's Majo here today to welcome you to a fun make using the awesome Grungy Butterflies . I was asked to create a Birthday card for an older lady who loves Butterflies to pieces, but doesn't like any "bold & beautiful" colors. Her choice would have been black & white with "glimmer". Well, I was able to talk her out of that  .... at least. No glimmer for and from me. I decided to keep the colors mute by using kraft cardstock and my contribution to glimmer was heat embossing. If she turns her card a bit, it will shine, and therefore she has some resemblance to "glimmer" I stamped the main images randomly over the panel and heat embossed with Ranger Super Fine Detail Powder. After stamping the Birthday Greeting I decided that I needed some frame, so I added the beautiful and delicate leaves from the Grungy Flower Set. The sentiment is part of the set Happy Birthday.     The following stamps I used: Happ

DIY Doodle Flowers Watercolour Tags

Image
Hey there everyone, it's Mandy here and I'm excited to share my second guest designer project using the Doodle Flowers stamp set with you. As soon as the stamp set arrived, I knew exactly what I wanted to use it for. It just screamed water colouring and fussy cutting to me and I immediately thought of cutting the different flowers out of different kinds of papers to decorate watercolour tags with them. Fussy cut Doodle Flowers First I prepared the flowers to fussy cut them out. I used: Doodle Flower stamp set, different kinds of watercolour paper & vellum (please feel free to use what you have on hand, also paper scraps are fine for this step), VersaMark stamp ink and different embossing powders. I decided to go with some pink and mint toned, gold and white embossing powder. In the end I used also clear embossing powder. Embossing buddy, and heat gun I stamped the flowers on the different papers using different embossing powders and cut them ou