Posts

Showing posts from June, 2021

Create Adventure by Lisa Rabellino

Image
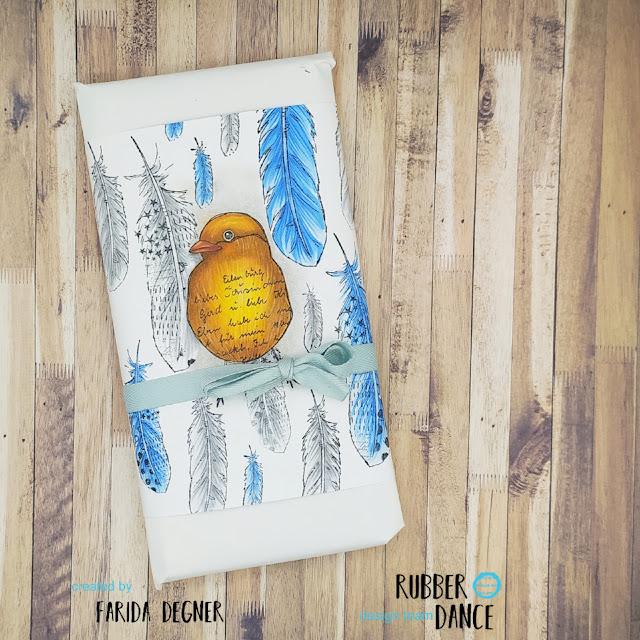
 Hi friends!  Lisa  today with you on the blog and I'm happy to share my new art journal inspiration for Rubber Dance design team playing with some fabulous stamps and my favorite watercolors! I love creating my personal collage papers. So I took a piece of white tissue paper and I stamped various flowers and leaves with black archival ink from Inky Flowers stamp set. I glued my pieces on the page with gel medium and so I used my favorite watercolors to create a rainbow effect on the background. I prepared other elements for the page with Textured Birds and Journal Words stamp sets. I made some stamping with Mix A Sentiment stamp set and teal archival ink. Finally I made some splatters with black liquid paint to give more interest on the page. I used these products from the shop:  https://www.rubberdance.de/small-sheets/journal-words/#cc-m-product-14204763033 https://www.rubberdance.de/big-sheets/inky-flowers/#cc-m-product-14383087433 https://www.rubberdance.de/big-sheets/textured-

MAGICAL FLOWERS Mixed Media TAG

Image
Hey Rubber Dance Friends, i'm back with a Mixed Media Tag today.  I've used the Sketchy Flowers #1 on a Gelprint and added the center of the flower with a piece of Vellum, i did some heatembossing on the vellum. That looks a bit more elegant, doesn't it?  The base for the TAG is a Gelprint too. I love to work on these surface every time. It gives you so many opportunities.  Enjoy your day and do not miss to join our Rubber Dance Stamping Lounge on Facebook, where you can find a lot of inspirations and our monthly challenge. Happy Crafting Dunja xx Sketchy Flowers #1 Mixed Media Marks Mix A Sentiment #1

Fish Bowl by Angie Coomber

Image
 Hello arty friends, how are you all? I've just become the proud owner of a set of the Textured Fish stamps and of course I had to use them straightaway. I used my favourite technique of swiping Distress Oxides on my craft mat, spritzing with water and then mopping up the colour with white card. I absolutely love those vibrant colours. Then I stamped some of the images on the card - as you will see I only used a few of these in the end but it never hurts to have stamped images ready for next time, does it? I also cut these out of course. I created a background in my art journal using Distress Oxides and an applicator brush. I sketched a fish bowl on the page on the left and glued a piece of scrapbook paper to the other side. I cut out the fishbowl shape, then used this page as a template to lightly trace the outline on the coloured page. Next I arranged some of the fish and seaweed on the background and added a little bit of background stamping. I glued a piece of acetate to the ba

Textured Bird Gift Wrap by Farida Degner

Image
Hi everyone, Farida here. I always like to decorate small gifts a little bit to make it more interesting.  Today I made a wrap for a chocolate bar.      First I took an A5 sized paper piece and started by stamping my focal point, the bird from the Textured Birds  stamp set.      To give some visual dimension to this art work I stamped the bird a second time on another piece of paper, fussy cut and laid it over my first stamped bird. With this protection I started stamping some Feathers for the background.      For colouring in the bird and the feathers I started by using my alcohol markers and just did quick colouring with just a bit of shading. Afterwards I switched to pencils to give the images a more detailed and textured look.     For my focal point bird I decided to colour in a shadow around him, so he can stand out a bit more. Et voilà!  Just needed to wrap it around the chocolate bar and tie a bow. Hopefully I could inspire

Be Strong Postcard by Toni Tickner

Image
  Today I have a inspirational postcard using a gelli print background and the This is Me stamp set  I wanted to do something bright and inspirational.  The quotes and the face stamp are from This Is Me set, the background stamps from Mixed Media Marks and the stars from Textured Christmas Trees .  Using one of my favourite techniques Asemic Writing which gives you the beauty of having your feelings down without it being readable LOL This was a quick and simple piece to make using your gel prints, of which I have so many LOL I hope you have an amazing weekend and have time to get crafty  Toni XoXo   

Textured Birds booklet by Ellie Knol

Image
  At the moment I rather give a person a little booklet as a gift than a card.  An easy book with all the edges torn along a ruler.  You might guess that the cover has been made with a gelliprint.  I added some stamped script to it, a fussycut bird and a sentiment.  The shell-pieces finish it off, knotted with the thread from binding the pages.  Enjoy crafting!  Ellie Knol  Rubber Dance Stamps: The Rubber Dance Webshop Textured Birds Grungy Swirls Mix A Sentiment 1

XL Tag with Inky Friends moths by Priss

Image
Hello my friends!!! Priss here. Today I've made this XL Tag with the wonderful moths stamps of the set  Inky Friends First, I painted my Tag with Oxide inks of the colours, Orange, Pink and Yellow. Then I stamped, here and there, with my favourite stamps of sets  Mixed Media Marks and Mixed Media Circles , with similar colours, but permanent inks. To make more layers, I stamped with Embossing Powder and made some marks with a Stencil and Oxide Inks. Then I used my gelatos and soft crayons to distress the border of the Tag in yellow and pink. To add more depth to the background, I stamped some number and stitch marks with black permanent ink. Then I made some white splatters, here and there. Now the background is almost ready. Just put a wide eyelet and attach some silk ribbons with the colours selected.   I chose some Die Cuts of flowers painted in similar colours and built my floral composition where these beautiful moths from the Inky Friends set will rest.  Now I le

Art Journal page Botanical

Image
  Hi, I'm Vero (@ Vero.kt) and I welcome you to today's inspiration. How's everybody ? I've been playing with     Mixed media marks   , Antique Botanicals   and   Round in circles    to create a  page in my little art journal. I hope you like it. I started by cutting watercolor paper into a square, 4x4 inch format, adding color with pigments. To speed up the drying process, help me with a dryer.    To add texture, use multiple stamps with inks in shades similar to the background. With permanent black ink, false stitching that stands out against the colorful background I choose one of the Antique Botanicals stamps, stamp it on a book sheet, and then cut it out. One of the parts that I enjoy the most is the composition, I have to admit that it is usually the part that takes me the most. Now I leave you some photos with details of the project.I hope you like it as much as I do when making them. Here are the Rubber Dande Stamps I used: Mixed media marks Antique Botanicals R