Posts

Showing posts from June, 2022

Easy art journal page by Lisa

Image
 Hi friends!  Lisa today with my new art journal inspiration for you with some awesome Rubber Dance stamps! First I stamped some branches with versamark pad and I embossed them with white powder. Then I used some Distress Oxide as watercolors to give color to the background. I used Mix A Sentiment 3 with archival ink for little details. I stamped a Butterfly from Inky Friends stamp set and I used it as the focal point of the page with a sentiment. Finally I made splatters with black liquid paint to add a little contrast to my art journal inspiration. I used these products from the shop: https://www.rubberdance.de/small-sheets/mix-a-sentiment-3/#cc-m-product-14519570233 https://www.rubberdance.de/big-sheets/inky-friends/#cc-m-product-14383086833 I hope you enjoyed my new art page for you today! Hugs, Lisa 

Leaves Collage art journal page by Ellie Knol

Image
Today another page in my gelliprinted-pages-journal.  The HOW-to: - Gather fussy-cut images to fit the background: - Decide on the composition, just roughly. I changed it a little in the end: - Stamp in the background with a coordinating color; I chose red:   - Stamp in the background with the same ink the fussycut images were stamped with; in my case Archival Ink Plum: - Add white doodling and edges with a white acrylic marker. I used Posca.      - Adhere the focal images and sentiment to the page:  **** Another page and stamp set done in the journal.  See you next time,  Ellie   Rubber Dance Stamps: The Rubber Dance Webshop Sketchy Leaves (Clear - 0003) Pencil Marks # 4 Sketchy Flowers #1 Grungy Stuff Pick A Number

Choose peace & freedom - Card by Farida

Image
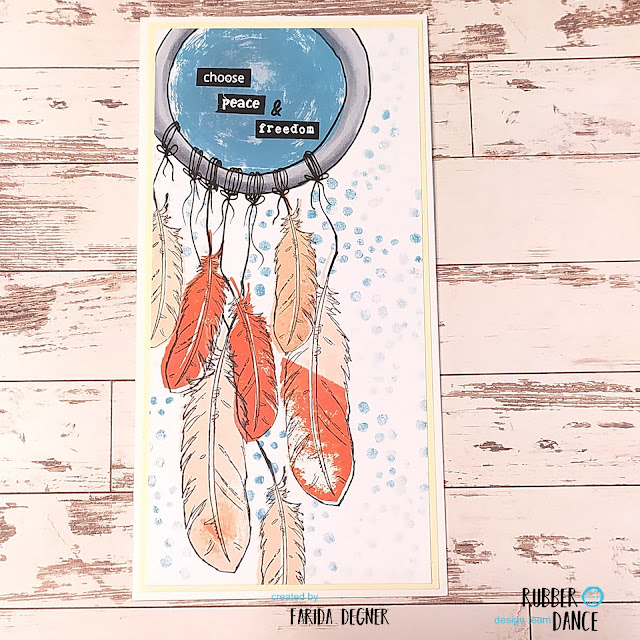
 Hello lovlies, I am happy to be back on the blog again. Today full of dreams and hopes to have a world with peace and freedom for everyone.  Inspired by my dreams and wishes I created this card with a dream catcher, mainly using the Textured Feathers Stamp set.  This stamp set comes with the some coordinating outline and full stamps. Thats amazing, so we can stamp the feathers coloured without using markers or pencils. Here I used some ink pads to stamp the inner parts and afterwards stamped the outline over it in black ink colour.  I have drawn two circles and coloured the inner part for the round dream catcher base. From the feathers to circle I added some lines as the thread and added some lines and bows, so it looks like they are wrapped and tied around the ring. On the background I used the dots that come along with this set to add some intrest on  background.  To finish teh card I added some words from the Mix A Sentiment #3 Stamp set.  Stay healthy and crafty. Greets Farida 

Scrap Diary by Angie Coomber

Image
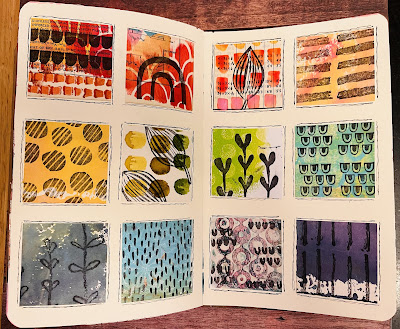
 Hello arty friends, Angie here with a page in my art journal. Recently I have seen someone keeping a scrap diary, meaning they collect bits and pieces from their desk, for example their underpaper or mop up pages, choosing the most interesting sections and cutting them into equal sized pieces, then gluing them onto a page for every month. Over time this provides a kind of record of the type of art you've been creating. I picked the pieces below to start with, about 3 of each colour. I worked out how many pieces would fit on my double page and chose the 12 I liked the most. I used the Carved Collection #1 and Pencil Marks #1 stamp sets to stamp on the squares, using black Archival Ink. Next I roughly sorted the squares into rainbow colours (one of my go-to's when I can't decide which order to put things in, haha), then glued them onto my journal pages. Finally I roughly outlined all of the squares with a black fineliner. I quite like this simple geometric design! Until next

Photo tutorial - art journal page with Kate

Image
 Hi,   today I have for you easy photo tutorial for cool art journal page. You will need just some basic tools and you can play with me. For this page I used Inky Flowers , Mixed media marks 1 , Journal words . Other material - some paper (I have my art journal), any kind of structure paste, any kind of colour - Lindys magicals, any kind of sprays, watercolours just what you have at home, waterproof black ink, some white ink for splatters, 3D foam tape, scissors, heat tool, stencil, spatula. 1. apply your paste through stencil just randomly at page, you can also apply paste just with spatula to have more structure at background, dry it with heat tool 2. take your choosen colours and apply them at page, I used Lindys magicals and I mixed them on page just with water, dry it 3. funny part is here - just random stamping to add more interest to your background 4. you can take patterned paper I took some of my gelli prints and I stamped on them Inky flowers and I fussy cut them and glued th

Multi Layerd Artist Trading Cards with Dunja

Image
Hey lovely Rubber Dance Friends, i'm back with a lot of layers today. Layers on these ATCs, do you know i love layers and bright colors in combination? Here I have really made many layers.  1. base = cut from Gelliprint 2. embossing of the check pattern in white 3. stamping for the background 4. stencil wiped with blue ink 5. texture paste coloured with blue ink and applied 6. applied an embossing layer of the stencil - for this I used different shades of blue 7. stamped the leaves on an old book page primed with gesso and cut them out. 8. the flower is stamped and cut out on a gelli print and then stuck on. 9. added some gold splatters DONE :))) Here are some detail pictures for you: Thanks a lot for stopping by again, hope you'll have fun creating.  Dunja   ( Blog  |  Instagram  |  Facebook ) Carved Collection #4 (Clear - 0018) Mixed Media Marks #1 (Clear - 0001) Loose Florals #2 Mix A Sentiment #1 Mix A Sentiment #2 Mix A Sentiment #3   Rubber Dance links: Website Facebook P

Atc´s Pencil Marks

Image
  Hi, I'm Vero (@ Vero.kt) and I welcome you to today's inspiration. How's everybody ? I've been playing  with   Mixed media marks 1 ,   Pencil marks  4 ,  and   Round in circle   to  create a  colorful Atc´s that I hope you like . Very easy to do, we started. We cut watercolor paper to a size of 2.5 x 3.5 inches, if you prefer to work in cm, 6.4x8.9. In my case, the paper is smooth and hot pressed, and I color the backgrounds with pigments. When the backgrounds dry (we can speed up the process with a heat gun) we will add texture and depth with different inks, in my case I have used distress oxide.To start, I choose a stamp from the  Mixed media marks  , apply the inks, spray water, and stamp, (I'm not looking for definition, I'm looking for a watercolor effect, watery). Help myself with the dryer and go back to stamp with different inks, to continue adding depth and texture. To add light and integrate the background, apply hot embossing in white One of the par