Posts

Showing posts from July, 2021

small edition [of summer] with the Textured Sea Creatures + REEL

Image
Hello Rubber Dance Friends, it's Dunja here today. Are you also in summer fun mode? Seahorses from the Textured Sea Creatures  are so wonderful and I used these Rubber Dance stamps today. Ok, this isn't a typical summer colour, with the bright colours, is it? Maybe it just puts you in a good mood :)) What do you think? I used a stencil with these many little circles and sprinkled and embossed them with texture paste and two different embossing powders from the latest WOW! release. I stamped the seahorses both on a Gelli print - my tip: nothing smudges with the StazOn! - and once gold embossed on vellum. I then cut them out and glued them on or sewed them on with the sewing machine, which gives such a special effect, doesn't it? At least i added a sentiment from the Mix A Sentiment Stamp Set - That's a Must Have for me :) Thank you so much for stopping. If you use the Rubber Dance Products make sure to tag #rubberdancestamps so we can check out your creations! Happy Cra...

Inky friend Affirmation Tag Book by Toni and a Giveaway!

Image
  Hey everyone, Toni here.  I hope you're all well  Today I'm bringing you a little tag booklet using lots of ribbon and stitching and some beautiful sunflowers from the Flowers Gone Wild , two of my favourite Inky Friends & a perfect positive quote from the Affirmations set  First I used my favourite masking tape to bind the tags then I added some embossed brick paper and filled the gaps in with Crackle effect paste    Using some Distress sprays I added lots of texture. Then lightly rubbed some white gesso over the top to add some definition Adding some stitching using my sewing machine to frame the tags  I stamped the Moth & Bee from Inky Friends on  acetate and embossed it with black embossing  powder to give it a stained glass window affect  Stamped the sunflowers from Flowers Gone Wild and  cut out just the heads, along with a quote from  Affirmations Placed it where I wanted it before glueing it all dow...

Sketchy Flowers Card with Farida

Image
Hello lovelies, Farida here. Nice to see you again here on the blog. Thanks for coming over. If you know me, you know that I love flowers and butterflies a lot. So I was pretty excited to get the new Sketchy Flowers #3 stamp set.  I started with inking a card sized white cardstock with my currently favourite colour combo in yellow and light pink. And use the oxide reaction by sprinkling some water over it.  For the next step I stamped some flowers from the Sketchy Flowers #3  stamp set with an alcohol friendly inkpad and used my Triblend Alcohol Markers to colour them in.  As I coloured in the stamps I got the idea to divide the background panel. So I grabbed rectangle die  out of my stash and some foam tape to glue it back a bit raised. Before glueing on the foam tape I decided to add some more interest to the panel. So I grabbed a Happy Birthday Sentiment and the little dots from the Joy in a Jar stamp set. Together with some violet embossing powder...

Bookmark with Textured Birds by Priss

Image
Hi Sweeties!!!  Priss here today. How do you lead with the Summer? I'm really not a Summer Fan, so I spend the mornings playing with paints before it takes so hot. For today, I hope to inspire you with this bookmark with the lovely  Textured Birds I used the emboss resist technique with a stamp from the whole Mix a Sentiment 1 set, for the background.  I used embossing ink and superfine white embossing powders. To colour the background, I used Distress Oxide Sprays in Blue, Yellow, and Pink. Then I sprayed some mica pigments onto a  leaf   stencil and used the stencil as a stamp to create another layer of colour and shine. Then I stamped, here and there, some of my favorites Grungy Stuff stamps and the dots that came on the Textured Birds set, with different colors. For the composition, I just took some scraps of paper and this gorgeous bird. I coloured the bird with my shine watercolours (I love them). With the same background and techniques, I created ...

Message for a friend by Angie Coomber

Image
 Hi arty friends,  How are you? I hope you're all well. I was looking through my stamp collection and realised I hadn't used my "You rock" set very much. I was also really inspired by Suzanne's Zine tutorial on YouTube so I thought I'd make a little zine to send to a friend. I started by stamping the quotes on a piece of paper - I like to use cream paper or old book pages so the quote isn't such a stark white on the page. I had made a few zines using gel prints on a recent camping trip and chose a brightly coloured pink/orange one. I decided to stamp flower images on scrapbook paper using embossing ink and white embossing powder, then cut them out. I also cut out the quotes I was going to use. Next I used embossing ink and gold embossing powder to add some background stamping to the pages of the zine. Finally I glued the flowers onto the pages, added the quotes and edged the pages with Distress Ink. A little gesture goes a long way, don't you agree? Un...

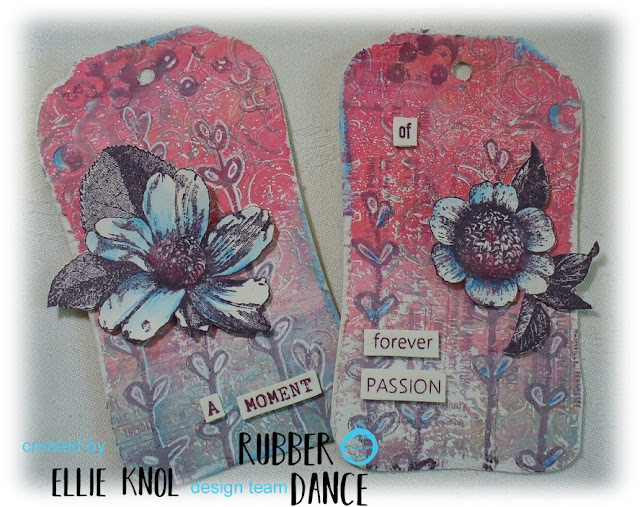
Grungy Botanical Tags by Ellie Knol

Image
I LOVE how these two tags turned out. As I go through the pictures, I will comment on how I created them.  Using a gelliprint of mainly red and blue; made with the use of the  Grungy Swirls  stamp; to adhere to a tag, is where it started.   Background stamping with the foliage from  Pencil Marks #1 , and the  Grungy Sequins , in the same color as the main flower gives some balance to the composition.  Fussycutting the main flower and adding a litlle bit of color to it. I removed the stems from both flowers, and a leaf from the biggest flower to fit the composition.   Using words from  Mix A Sentiment #1  adds another element to the tags. Of course I had to use a white acrylic marker to highlight some of the stamping and colors. Both flowers are from the  Antique Botanicals  stamp set.  I like the way these stamp sets work together, the sketchy and the vintage ones.  A close up of the smaller flower.  St...