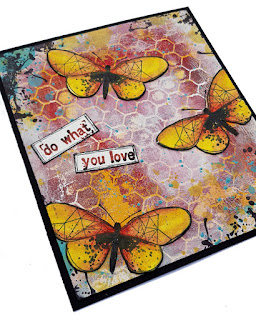
Small Grungy Butterflies Card by Dot
Hi everyone,
I hope you are all having a crafty week.
Today I've a tutorial for you that has some of my favourite things. The Small Grungy Butterflies has a saying with it that says 'do what you love' so I followed those words as I put this one together for you.
This is how it ended up ...
I followed the colour combo part of our May facebook challenge.
Are you nice and relaxed?
Here we go ...
Step 1: I grabbed a scrap piece of gelli printed card that was in my stash then brayered and finger-painted some white acrylic paint on it to tone back the brightness of the colour.
Step 2: I chose one of the butterflies from the Small Grungy Butterflies set and stamped them out onto some water colour card. Then I cut them out. I usually like to work in odd numbers.
Step 3: I coloured them in with water colour pencils. The intensity of colour was built up gradually because sometimes I'm a little shy with colour. True! Start light, then build on it, is always a good way to go.
Step 4: I added some blue acrylic paint through a stencil for the 'blue' element of the challenge. Then I decided to flick a little of the left over paint across the card. Watering it down first so that it flicks instead of blobbing.
I also bought some of the new Distress Oxide sprays the other day. I sprayed a bit on my craft sheet and picked it up with acetate and added some extra yellow to the background. It was so easy!
Step 5: I wanted to bring a little black into the edges of my card so I grabbed this stamp from I Heart Art and just inked up the grungy outer bits. Randomly stamping them on my card. I like to leave some blank areas on the border. There isn't any need to stamp every spare space around the edge. Sometimes it can look a little heavy.
Step 6: Have you ever wondered how to get the antennae on the butterflies without having to cut them out? You can see here that I've stamped them onto the card. There was no need to cut out the fiddly bits because when I attach my butterflies there will be antennae poking out from underneath!
To finish this one off it is simply mounted onto black card.
The words are from the same set. I've inked them in red and black archival just to be different.
I hope you enjoyed the tutorial.
Stamps Used Are:
Small Grungy Butterflies
I Heart Art
Other Products Used:
water colour pencils
Gelli Print
Archival Ink
Distress Oxide Spray
Stencils
Paint
These butterflies are so much fun to play with!!!
Happy Stamping
Dot x


Comments
There iare always so many different ways to use our rubber stamps ... it's nice to share :)