Posts

Showing posts with the label helen allen

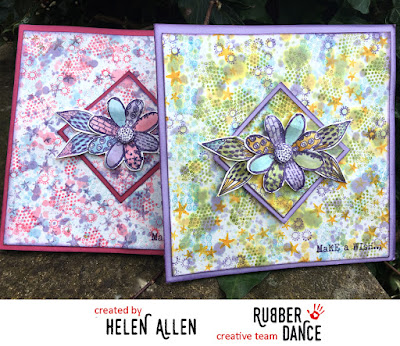
A Pretty Textured Card
Image
Good Morning Everyone Helen from the Creative Team here today. It has been a long time since I have shared a tutorial with you here on the Rubber Dance Blog and I really hope you like the tutorial for this pretty card using the wonderful Textured Flowers stamp set and sentiments from  Happy Birthday . In the video tutorial I will show you how to use all the many texture stamps that come in this stamp set to create a pretty background using Distress Inks.  You can make this background in any colour combination you like and could use it on other projects too. As usual I will show you how to make the inside look as pretty as the outside: I have had lots of fun creating with the Textured Flowers stamp set and have been using it in my real life card classes and my students have loved the variety of cards we have made with them. So this is the first of a couple of tutorials featuring this lovely stamp set.  I hope you will enjoy my vide...

Introducing a New Concept - with Helen Allen!

Image
Hi everyone! Bibi here today (owner of Rubber Dance), and I'm s o happy to announce a new collaboration with the lovely Helen Allen over at The Craft Project!  You may know that Helen has been on my Design Team since August 2014, and perhaps you have wondered where she's been hiding since you haven't seen her around for a while....  Here's the reason why:  Today we are  ready to launch a brand new concept and bring you Stamps and Tutorials  - all in one awesome package! What you'll get: * Access to 10 online classes (video tutorials) by Helen Allen. * Pdf file with project photos, cutting guides, printables and suggest materials lists, also by Helen Allen. * A whole set of rubber stamps, shipped to you from Rubber Dance and yours truly. The Tutorials: ​Helen Allen is a teacher and designer with nearly 9500 followers (and counting) on her YouTube Channel!! She guides you through each of the 10 projects, giving you lots...

I'm Not Dull!!!!! Check out the Evidence ;-)

Image
Hi Everyone, it is Helen on the DT here and it is my turn to share an idea or two with you this rainy Sunday (perfect crafting weather!!) I am using some gorgeous and brand new stamps from the lovely Bibi today and I know you are going to love them.  They are Envelope Stamps and are perfect for putting the finishing touches to all your crafting mail.  If you love taking part in swaps or pocket letters then these are must have stamps to add to your collection! My tutorial today is more of a look what you could be doing and an ideas tutorial rather than a detailed step by step.  I was inspired by one of the many, many stamps in this set that says 'Only dull people send dull envelopes'!  Challenge laid down and accepted Bibi………… I started out on my crafting journey thinking just envelopes and then things took on a life of their own as you will see.  One envelope became a pretty set of three…… I even created one to send to Australia!!!  You have...

Alcohol Ink Ombre Technique

Image
Hi Everyone, Helen here! It is my turn to share inspiration with you today.  I hope you are having a fun weekend and are managing to fit in a little (lot) of crafting ;-)  Welcome to anyone popping by from my YouTube Channel! Today I am sharing a tutorial and card idea that means you can create quick and vibrant backgrounds that are perfect to stamp on top or with any combinations of your Rubber Dance stamps.  Once you have mastered the technique this is definitely a card design that can be made in a hurry but looks fab! So if you are like me and absolutely Mrs Disorganised when it comes to birthdays this one is for you!!! As you can see you can use many different colours for this effect and lots of stamps would work to create this look. In the tutorial I show you how to achieve this cool background so get out your alcohol inks and off we go………Oh before I forget here are the all important card dimensions as promised: Cutting Guide: Black Card: 9" x 7 ...

Rubber Dance Stamps with Acetate and Acrylics!

Image
Hi everyone it is Helen here today sharing another video tutorial for you to try out. Todays two cards are stamped onto acetate sheets and coloured with acrylic paint.  This is a fun technique and I love how this has turned Katy's lovely Antique Botanicals into quite a modern and graphic card design…….and I have just realised that I have called the stamps vintage blooms on my video tutorial!!!!  Back in a jiffy!………I think I have sorted it out but if I revert in the tutorial to calling them vintage blooms just ignore me ;-) On with the cards!!! The card on the left has been made with a very old piece of acetate indeed - It has been in my craft room forever……..I think it would have been used to make slides for graph presentations many many moons ago!!!!  I wanted to show that you are not limited to plain acetate when you try this technique and that printed acetates can work too. As usual the inner matches the outer although this time I have left out the greetin...

February Challenge Reminder

Image
If you're feeling the love after Valentine's Day yesterday then you might be in the mood to join in with our February Challenge ! The (optional) theme is Love and the colour swatch you need for this month is below - we went for a twist on Valentine's colours adding a pop of bright turquoise with the traditional red. Need some inspiration? Check out these examples from our wonderful DT. By Helen (video tutorial  here ) By Gabriele (step-by-step tutorial here ) Full challenge details are in this post.  Great entries so far - keep them coming! Love from, The Rubber Dance team x

A Valentine Giveaway!

Image
Hi everyone, it's Helen here. It is my turn to share a tutorial with you all today and to wish you all a Happy Valentines Day! I made romantic bunting with my brand new I Heart Art stamps!  In the tutorial I show you how you can make bunting too! I show you how to create a fun paper collage background and then use these fab new stamps to add some romance to each of the 6 flags in my string of Valentines Bunting! I am not sure if I made my bunting for my husband or myself ;-)  I might have to wrap them up for him to give to me tee hee! I hope you enjoy the tutorial and even if you think I don't want to make romantic bunting what about following the technics to create some travel bunting?  You could use maps and tickets and snippets of brochures with the odd photo thrown in to create a record of your travels on a string of bunting!  I think I may try that idea myself. Now for details of the fun giveaway! If you are visiting from my b...

Snowy Valentine!!!

Image
Hi Everyone My turn to share a tutorial with you today.  The Design Team were given the prompt of frosty for this months projects and what started out as a potential Christmas Card ended up as a Snowy Valentine - the choice is yours! I mixed up my stamp sets this month and used a bird from Vintage Birds, a sprig of pine from Pines Fir Yew (love that title) and last but not least the sentiment and kiss came from Winter Wonderland.  All of course are available from your local Rubber Dance shop!!! Once I had stamped my two little birds canoodling on the wire my card took a romantic turn. Don't you just love the little kisses stamp that comes with this set of wintery sentiments?!  On the video tutorial I will walk you through how to create this frosty looking card for yourself.  Hope you enjoy watching and get inspired to get frosty yourself! Cutting Guide: White Card Base:  11 1/2" x 5 3/4" scored at 5 3/4" or 29 cm x 14.5 cm scored at 14.5 cm Bl...

Funny and Happy Birthday!

Image
Hi Everyone Today I am bringing you a tutorial using the latest stamps from Rubber Dance - Happy Birthday and Funny Birthday!  I love them both and they worked really well together for my card. These were such fun to make - a great way to use up your patterned papers too!  Pick a patterned paper to suit your recipient match it with two plain colours of card - one dark and one light and off you go.  The tutorial below will show you how: Cutting Guide: Dark Base Card - 8" x 8" scored at 4" or 20 cm x 20 x cm scored at 10 cm Patterned Paper (Cut 2) - 3 3/4" x 7 3/4" or 9 cm x 19 cm Light Inner card - 3 1/2" x 7 3/4" or 8 cm x18 cm Light Tags for stamping (Cut 4) - 3 14" x 1 1/4" or 8cm x 3cm Dark Tag frames (Cut 4) - 8.5cm x 3.5cm Patterned Tabs (Cut 2) - 2 3/4" x 1" or 6.5cm x 2.5cm Dark Card Tabs (Cut 2) -2 7/8" x 1 1/8" or 7cm x 1 1/8" or 7cm x 3cm As usual I have made the inside match the o...

Creating a Scene!!!!!

Image
Hi Everyone hope you are all in the mood for a bit of festive creativity!!! This month I have been having a whole heap of Christmas fun with the lovely stamps Bibi sent for this month's Design Team challenges!  Today I am sharing a tutorial that shows you how I created this card using home made masks and stencils and a little bit of Distress Ink. I had the perfect stamp sets to finish off my scene.  The pine branches come from the Pines Fir Yew set (NP6-M)….at least I am calling them pine!  I am not one hundred percent sure I am right but I know you won't mind if I am not!  I loved using the stamps to make it look like I am peering through the branches to the snowy scene beyond! Of course I just had to continue the theme inside the card.  Both of my sentiments are from the Christmas Greeting set (SEC4-M).  I love this set as there are so many different sentiments with all different fonts so they are very versatile indeed. Welcome to anyone...

Two for One!

Image
Hi Everyone Todays video tutorial shows you how to take a card design or element you like and use it to make another card……or more!!! I used stamps from the brand new Da Vinci (DAV1-L) stamp set to create my cards today and you will see how I made this cute daisy panel in the video.  I knew I wanted to focus entirely on this lovely stamped image so I framed it to create this elegant card.  Although on the video I show you how to make an inner using a quote stamp that comes with this set I thought at the time this design would make a great card for sending a note to someone to say thanks or just to let them know you are thinking about them.  Thinking ahead to Christmas you could make a set of these cards with different colour daisies and stamp a few matching envelopes, tie them up with a bow and you have a lovely gift for a friend or a stocking filler for your Mum! I loved the little daisy tile so much I just had to take it one step further……. Check out the...

Heat Embossing with Rubber Dance Stamps

Image
Hi everyone, I hope you are having a fun weekend.  Today I am sharing another Rubber Dance You Tube Tutorial.  I have had great fun thinking of card designs to make using one of Rubber Dances new stamp sheets.  There have been four launched this month and I hope that I can tempt you to pop over and check them out! This card features a couple of stamps from the new Vintage Birds (B2-L), a couple of stamps from the Maple Leaves set (NP2-M) and last but not least a lovely sentiment stamp from the Think Again (SET2-M) stamp sheet!  So this tutorial definitely asks you to look at the stamps you have in your Rubber Dance and other stamp collections and to be daring and mix them up a bit! Cutting Guide: Green Card Base:  11 1/2" x 5 3/4" scored at 5 3/4" or 29cm x 14.5 cm scored at 14.5cm Cream Card, Front and Inner (Cut 2): 5 1/2" squares or 14cm squares Cream Quote Card: 2" x 2 1/2" or 5cm x 6.5cm Green Quote Card: 2 1/4" x 2 3/4" ...

Just Chillin' - Design Team Tutorial

Image
Hi Everyone, Helen from the DT here with a fun card tutorial. I have been using the Hot, Hot, Hot stamp sheet this week and here is the second of my shares!  I love how this fun card has turned out.  I think it has a little Mexican style that works perfectly with the gorgeous Chilli Pepper stamps! This tutorial shows you how to use these lovely stamps to make a fun fiesta style background and how to turn a Chilli Pepper into a Chillaxed kinda guy! I show you step by step how to create this card including this fab inner which I think could easily be and outer!!! ;-) What do you think? Cutting Guide: White Card Base: 11 1/2" x 5 3/4" scored at 5 3/4" or 29 cm x 14.5 cm scored at 14.5 cm White Card Topper: 4 1/4" square or 10.5 cm square White Greeting Strip: 2 3/4" x 3/4" or 7 cm x 2 cm Black Topper: 4 3/8" square or 11 cm square Black Greeting: 7.5 cm x 2.5 cm Stamps used for this card: Hot, Hot , Hot stamp sheet (NP7-M), wh...