Posts

Showing posts with the label envelope

Mail Art Envelope by Angie Coomber

Image
 Hi arty friends, it's me again! I have a quick mail art envelope for you today.  I had some watercolours to use up and decided to decorate a few envelopes. I love spending time painting simple leave shapes (very calming and relaxing) so that's the first thing I did. Once the leaves were dry I sketched over them with a fine black pen, then added some neon pink splatter. I n the spirit of using up things on my desk I stamped some of the Inky Friends on a few Gelli print scraps. For this I used embossing ink and black embossing powder. I cut out the butterflies and decoreated them with a gold gel pen. Finally I glued the butterflies around the edge of the envelope, leaving space for an address, and added a doodle border around the outside. Oh - and a little word sticker. Hope you like it! Hugs from Angie x Stamps used: Inky Friends

CAS butterfly on card and envelope by Ellie Knol

Image
Ellie here today with a little inspiration, I hope you are doing fine!!   For today's card (and envelope)  I chose for a clean-and-simple composition,  which is a style I don't use too often. I masked the butterfly (or moth actually) to be able to stamp the script (Art Defined) 'behind' it.  The images have been colored with watercolor pencils, the blue background with PanPastel.  I splattered white ink to finish it off...  Rubber Dance Stamps: The Rubber Dance Webshop Inky Friends Art Defined

Envelopes, Envelopes! By Judi Kauffman

Image
By Judi Kauffman for Rubber Dance Thanks for inviting me back as a guest designer! I’ve got a confession to make. I sometimes like stamping envelopes more than making the cards that go inside of them. Envelopes are inexpensive and meant to be thrown away once they’re opened so there is zero stress if something isn’t quite perfect. I spread out a dozen or so at a time and whip up a batch that uses the same stamps and ink(s), each envelope one-of-a-kind within the series. Care to give it a try? Simply fill a table with your favorite stamps (a LOT of them in varying sizes), a few acrylic blocks (I use low-tack double sided tape on mine, and nothing on the back of the unmounted rubber), and an inkpad or two to get things rolling. Stop at a dozen or set aside the first batch and keep stamping! The more you make the more ideas will pop up. At about 3 cents each, why not! Go for a quirky, whimsical look or keep things serene and elegant. No rules, no planning needed other than...

Mail Art by Yasmina

Image
Hello! Yasmina here today! I have a simple project for you...  mail art.  I love receiving cool mails in my box.  It's better than invoices or taxes, right? I used some acrylic paint, and two sets of Rubber Dance stamps...  Textured Flowers and Beautiful Words. You'll find them in the fabulous new shop! :)  For stamping on my envelope I used Archival Ink, which is permanent and very good for mixed media projects. Here is the back... I have a video tutorial for you! I hope you enjoyed it! ;) Don't forget our current challenge! It's HERE. You have until the end of the month. Until next time....

Tutorial Mail Art by Majo

Image
Hello my crafty friends.  It's Majo here today to show you how to create a Mail Art  envelope using lots of Rubber Dance Stamps along with stencils, distress ink and drawing gum. Let's get started .,.... I stamped the circles and the border with Archival Ink and masked them. I added the watch, the stamp and the "person" and also masked them. To give my envelope colour I used 4 different distress inks: Scattered Straw, Spiced Marmalade, Peeled Paint and Ground Espresso and spritzed some water on top to have an interesting texture. I used two different stencils and then I started stamping again, that's what it's all about, isn't it? I used the following sets: A little Birdie ...., Collage Elements 1, Envelope Stamps, Round in Circles and Stitch and Frame, all so very versatile! As a last step I just rubbed off the masking. Many different sets of stamps on my table and finally on my mail art envelope. You can  ...

Mail art tutorial

Image
Hello my dear crafty friends and welcome to my Mail art tutorial made for Rubber Dance blog. This is my second recycled envelope only; I am just on my learning curve, but I think that the result looks fine. So here is my tutorial and remember to recycle your envelops as thing is good for the Earth and for all of us. STEP BY STEP INSTRUCTIONS: 1.Find a good thick  used envelope and open it from inside. Cover it with a thin layer of gesso (not shown here) and let it dry. Paint over the gesso with a mix of Gel Medium based paints. I used Earth Safe Finishes Iridescents paints here, but any shiny semi translucent paint will work. While your paints are pretty wet wipe  some paint with baby wipe to leave this distressed white space look. 2. Tear a couple of rectangles from the left over paper and glue them as  shown  with repositionable glue. Paint over both rectangles with one of the paints (I used shiny blue one) and add a thin layer of black em...

Easels & Envelopes by Judi Kauffman

Image
  Thank you for inviting me back as a guest designer, Bibi. I thought it would be fun to make something a little different – a Card Stand/Easel that can be mailed flat, inside a matching envelope along with a card, postcard, photo, calendar page, recipe, poem…whatever would look nice perched on the easel. Card Stand/Easel: Die cut an easel from heavy cardstock or lightweight board. I chose shirt cardboard from the laundry. Smudge the surface with inks in two or more shades of brown and let the inks dry, then stamp faux postage and envelope art stamps in black. Carefully and firmly fold the easel at a right angle along the scoring line and perch something on it. Enjoy! (Or leave it flat for mailing and write a note to the recipient so she knows how to set up the easel when it arrives). Envelopes: Start with Kraft brown 5.25” x 7.25” envelopes, or any size you prefer. (Larger envelopes offer more space for stamping, but small ones are fun, too.) Sta...

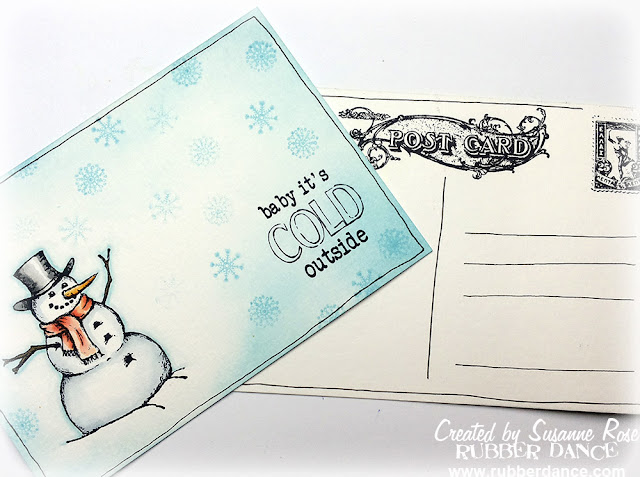
Christmas Post Cards by Susanne

Image
Hi my dear crafty Christmas friends! Today I'd like to show you two Christmas post cards with the brand new August release from Rubber Dance. I'm very happy stamping with these images, 'cause these are my drawings. It was a very special moment stamping the first time with my own designs. And I am so glad, that Bibi liked them and let them become Rubber Dance stamps. Let's talk about the postcards now: I used Frosty from the "Frosty Friends" set, as well as the snowflakes and a sentiment stamp from the "Winter Wonderland" set. The backside is created with the July "Envelope  Stamps" from Rubber Dance. I stamped the snowman on a piece of watercolor paper with jet black Archival Ink. I used a heavy weight paper. Next step was coloring the background with Distress Ink "tumbled glas" and the ink blending tool. I used the same color for the snowman as well as Distress Ink "barn door", "spiced marmalade...

Make Postcards with a few Easy Steps

Image
Hello my dear crafty friends! It's Irit on the DT here. Welcome to my new Rubber Dance post. You may have seen some previous posts about how to decoate envelopes with the new stamp set called Envelope Stamps. Today I want to show you how to use them to make some quick and easy Postcards! So here is how I made mine: Products used: Rubber Dance stamps : Dancing Woman and Violin player from Women collage set - for the front of my postcards.  Love as a sentiment from ArtyHearty set, and   Envelope stamps for the back of my postcards. Step by step instructions: 1. Cover two postcard sized white thick cardstock pieces with torn paper leftovers as shown (these will work as masks). Stamp the images with black pigmented ink and heat emboss with clear embossing powder. 2. Using a few shades of natural/brownish distress inks, color the inside of the masks as shown. 3. Remove the torn paper masks and this is your postcard front. 4. Stamp the w...