Posts

Showing posts with the label Pencil Marks #5

Autumn cards with Sketchy Leaves by Mariken

Image
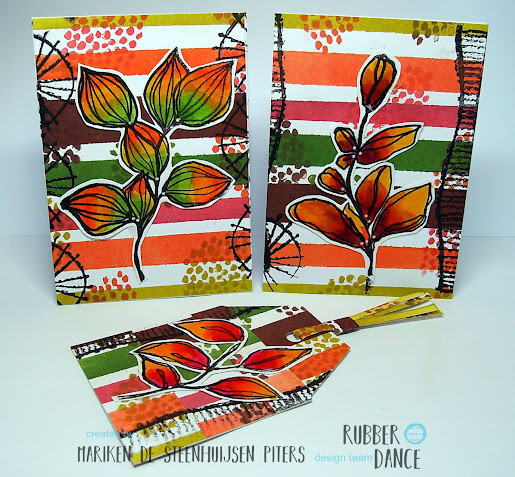
  Hi there!  Mariken here, with a tutorial for you, making these Autumn cards and tag, with these beautiful stamps!   I used:                                       Sketchy Leaves Clear Stamps and Pencil Marks #5                  For making the background I used masking tape, a sponge and different colors of ink.                                               This is the result, a beautiful striped background.                        I added some marks in matching colors with a stamp from Pencil Marks #5. I love to make a little tag...

Where Summer Ends and Autumn Begins by Samantha Read

Image
Hello, Samantha with you today and I'm sharing another page for my ever growing art journal. This page for me was lovely to create and I was trying to capture the last of the summer flowers whilst autumn fungi start to appear, it's my favourite time of year. Your eyes are not deceiving you, my page is a little wonky! But it was easy to make, here's how: For the colourful, central piece I created the background using stamps from the Pencil Marks #5 stamp set and distress inks. I prepared the journal page by simply stamping in grey ink some of the wonderful I Love Leaves stamps in just two corners as shown. The flowers, poppy heads, leaves and mushroom were stamped on white card and coloured using water colour paints and coloured pencils. To finish I added some black enamel accents and some white highlights with a Posca pen. I do hope you like it, here are the stamps I used: Pencil Marks #4 Pencil Marks #5 Textured Mushrooms I Love Leaves  Thank you so much for looking, for m...

How to improve an ugly background by Priss

Image
Hello, I'm  Priss  and I welcome you to a fun Tutorial improving a background that I didn't  like the first time.  Do you remember this art journal page I made for March ? Well, when I did the background the first time, it didn't turn out the way I expected. The Resist Technique didn't work well with the clear embossing powder, so I did it with Gold EP. But here nothing is thrown away, much less failed backgrounds. So I saw the failed background and my first idea was to make two labels. I cut the paper into two 2.5-inch stripes and punched them out with a tag puncher. I feel that my backgrounds need more light and elements that make a contrast. That's why I decided to stamp some rainbows of the set  Carved Collection 1 ,  with violet and yellow inks over silk paper. You know I love to use silk paper over my backgrounds. Then I glued  the rainbows and stamped over the tags with stamps of the set  Pencil Marks 5 . After that, I chose some Posca pens...

Retro Birthday Card by Angie Coomber

Image
 Hello arty friends, how are you? I was playing with the Pencil Marks #5 set recently and loved the retro vibe one of the stamps was giving me so I thought I'd make something for the blog. I used my favourite Distress Oxide technique to create some backgrounds (you can never have enough backgrounds, right?!). I just swipe a few colours on my craft mat, spritz with water and mop up with card or paper until I like the effect. You have to experiment a little bit - some papers work better than others. I chose a yellow piece for the background and cut it into a square to fit my card. Then I picked 3 complimentary colours for the circles and stamped 3 of each colour. Next I stamped 3 lines on the background for the circles to sit on. I cut out the  circles and glued them onto the background - I experimented until I liked the layout. After that I felt like the card needed something else, and eventually I decided to stamp another one of the images from the set onto the same yellow car...

Colorful cards and tags with several stamps by Mariken

Image
Hi everyone! Mariken here, with a tutorial for you, making two cards and tags. I used :  Sketchy Birds , Textured Spring , Joy in a Jar ,  Pencil Marks #2 , Pencil Marks #5   I made a gelliprint, using some stamps. You can see it in the background.      With my print I made two cards and two tags. I stamped the birds and flowers with black ink and cut them out.  After that I stamped some marks and sentiments on the cards and tags. A finishing touch with some colorful ribbons and washi-tape. There you are, in a very simple way you've got two lovely cards and tags..     The stamps I used:  Sketchy Birds     Joy in a Jar   Textured Spring   Pencil Marks #2 Pencil Marks #5 A little reminder that our beautiful Inspiration Board March  continues in the  Rubber Dance Stamping Lounge  on Facebook. We hope to see you there.     Thank you for your visit and enjoy your day! Mariken XX