Posts

Showing posts with the label DT Cornelia

Textured Mushroom and a Tutorial with Cornelia

Image
Hi Everyone, Cornelia here today. Sadly this is going to be my last post as Rubber Dance DT member. Life has become too difficult for me, so I decided to step down. I have been really enjoying playing with those wonderfully interesting stamps. Susanne is a great, supportive and generous store owner. Thank you for having me on your team and having trust in my abilities! I just had to play again with this wonderful  Textured Mushroom  stamp set.  This time I decided on a black background. I started out heat embossing the mushrooms one by one on black card stock. I used ultrafine embossing powder. Make sure you use a powder tool before you heat embowss to not have embossing powder stick where you don't want it to be. I stamped one of the mushrooms on a scrap piece of black card stock and fuzzy cut it. I colored the mushrooms with Prismacolor pencils I used Gamsol for blending the colors. I added white splatters. I added the cut out m...

Textured Mushrooms with Cornelia

Image
Hi Everyone, Cornelia here today. I am lucky to get my stamps on this wonderful  Textured Mushroom  stamp set by Rubber Dance. They are magical, aren't they? There are so many mushrooms to choose from. I did not use them all. Unfortunately I could not download a picture form the website. Not sure why, but you can look at it through the link I provided. I colored the mushrooms with water brush pens and fuzzy cut them. The background I had in my stash. I didn't put a sentiment on it, I figured I can do that later or not use one at all. Don't forget about our challenge, which goes until the end of the month. Play along, if you find time! You'll find it in the  Facebook Rubber Dance Stamping Lounge  and its those three colors you see below or anything goes with Rubber Dance stamps.

Grungy Rainbow Butterflies with Cornelia

Image
Hi Everyone, Cornelia here today. I always need some cards just to send out for no good reason or just a little picker upper.   Grungy Butterflies  from Rubber Dance will lift everyone's spirits! My stamp supplies: Grungy Butterflies I stamped the butterflies and wet them generously with water. Took Dylusion sprays and dabbed color onto the wet butterflies. Took a spray and sprayed them with water and let the water run down the card.The sentiment die is by STAMPlorations. Don't forget about our challenge, which goes until the end of the month. Play along, if you find time! You'll find it in the  Facebook Rubber Dance Stamping Lounge  and its those three colors you see below or anything goes with Rubber Dance stamps. Happy Rubber Dancing!

Fly-Fly Flower Tutorial with Cornelia

Image
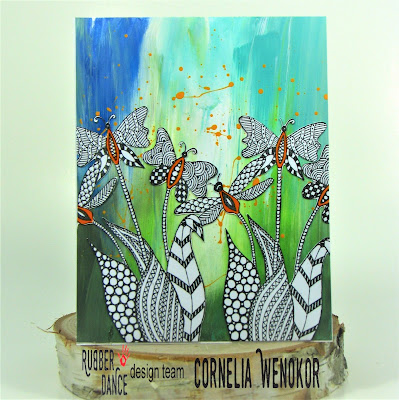
Hi Everyone, Cornelia here today. I recently got this gorgeous stamp called  Fly-Fly flowers  from Rubber Dance. It needed to go on a card. My stamp supplies: Fly-Fly flowers And that's how I did it: I stamped the flowers twice and cut them with my Scan'N Cut. Added some drops of cheap Acrylic paint (from Michaels) onto thick card stock smeared it with my fingers and let it dry. Splattered orange acrylic paint onto my panel and let it dry again. Glued the flowers onto the card base. I thought it needed some more pop of color, so I took an orange marker and colored the butterfly bodies with it. Looked much better. I decided to not use a sentiment. I don't think it really needs one. Don't forget about our challenge, which goes until the end of the month. Play along, if you find time! You'll find it in the  Facebook Rubber Dance Stamping Lounge  and its those three colors you see below or anyt...

Grungy Butterflies with Cornelia

Image
Hi Everyone, Cornelia here today. I needed to restock my get well cards and the  Grungy Butterflies  from Rubber Dance will lift everyone's spirits! My stamp supplies: Grungy Butterflies ,  Doodle flowers I made a background using Brushos and Color Bursts. I then stamped the Doodle Flowers in similar colors onto my card base. I stamped the butterflies and cut them on my Scan N Cut. Assembled the card. The sentiment dies are by STAMPlorations. Don't forget about our challenge, which goes until the end of the month. Play along, if you find time! You'll find it in the  Facebook Rubber Dance Stamping Lounge  and its those three colors you see below or anything goes with Rubber Dance stamps. Happy Rubber Dancing!

Happy Birthday to Moo

Image
Hi Everyone, Cornelia here today. That Moo to You set is just up my alley! You can also get the stamps separately and don't have to buy the entire set, if you just fall in love with one of the cows. Here is the entire set: From Moo to You And that's how I made this card: I stamped the cow and the sentiment. I took some sand paper and created graphite dust from a pencil   Took a stencil and sponged the graphite mostly around the cow. Took the stencil off. You can see that there is graphite dust on the cow, but that will easily come off with an eraser as you can see here. I like those knead-able erasers best for that. I then colored the cow with markers. Added Stickles to the cupcake and candles. Don't forget about our challenge, which goes until the end of the month. Play along, if you find time! You'll find it in the  Facebook Rubber Dance Stamping Lounge  and its those three colors you se...

Magic Fish Card

Image
Hi Everyone, Cornelia here today. I love interactive card and especially those magic cards, where the color all of a sudden appears. So here you see the card with the slider in and below its out. My Stamp supplies: Fish Diet  Such a hilarious set, isn't it? And that's how I made this card: I stamped the fish I colored it with Inktense Stamped the fish again onto a clear acrylic sheet Took blue card stick and cut it to size Glued the colored and clear fish in, so they perfectly overlap Made the slider and added stops to the blue card base, so you don't pull it out accidentally and then glued it all together. I also added some green paper to the end of the slider, decorated it and decorated my blue frame. It's better to do this beforehand, because if you don't use heat resistant acrylic it can warp... And now the color magically appears if you pull the slider. See! You can make this in any ...