Posts

Pillow Box

Image
Les innlegget på norsk (post in Norwegian)   Hello. Welcome.  Gail from the design team here today with a gift box using autumn colours.   I used the colours from Rubber Dance October 2015 challenge.  This month it's two years since Rubber Dance started its challenge blog and there are five of the previous colour schemes to choose from if you want to join this month's challenge   I started with a sheet of white handmade paper that had some stitching on it.  I stamped the large spiral from Round in Circles with Versamark ink. I used Fired Brick, Mustard Seed and Frayed Burlap distress stain and sprayed with water.  The Versamark ink stamping shows up like a watermark.   I used double sided tape to stick my paper to a plastic pillow box.  This was the packing for some embossing folders.   I added some lace along one side.    I used one of the stamps from Nostalgic Couples .  The black ...

Da Vinci layered cards

Image
Hi everyone, it's Liesbeth here showing you two cards I made using the wonderful Da Vinci plate!  I also used stamps from Round in Circles and Travel .  These three plates are so perfect to combine!  They're built up in layers with many different inks, spray and paint. Here's how to create them: Take a piece of white cardstock and sponge a thin layer of light and dark Distress Paint using different stencils, at the right and left edge. After drying, sponge big coloured areas with Distress inks: I used pink, purple and yellow and on the other card blue, orange and yellow. The paint works as a resist!  Spray a tiny bit of Dylusions spray onto two corners of the card (I used pink and blue).  Stamp the women with StazOn Jet Black and mask them with masking paper.  Then stamp the flower here and there with orange StazOn (blue/orange card) and some circles with pink StazOn onto the other card.  Cover the...

Textured Mixed Media Tags by Susanne

Image
Les innlegget på norsk (post in Norwegian) Hi my dear crafty friends. It's Susanne writing today and I'd like to share some mixed media tags with the "Textured Flowers" and the "Textured Feathers" stamp sets. You can use this "recipe", of course, also on cards, ATCs or art journal pages. What you need to start is a watercolor background. I cut a tag from one of my Brusho papers: I added some color splatters with a Neocolor II crayon. I often use this technique, because it works quick and easy. Just scribble some color onto your craft mat, spray water on top, pick it up with a brush and sprinkle it all over your project :-) I decided to use something more shiny than the Neocolor II crayons also. So I activated some Twinkling H2Os and sprinkled them on top of my tag. Always wait until one layer of colour is dry, before you add the next one! I stamped two of the flowers from the "Textured Feathers" with black ink and col...

The Artist's Workshop - Vintage Card

Image
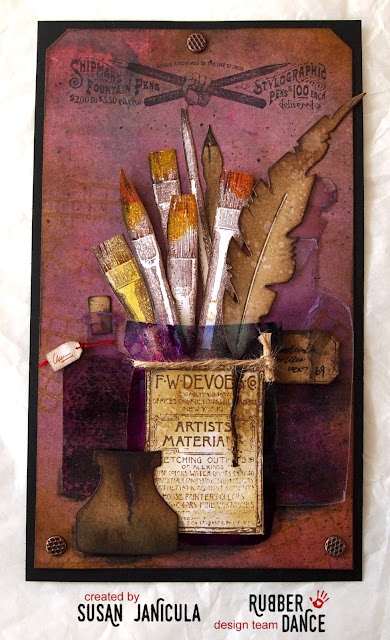
Læs dette indlæg på dansk (post in Danish) Hello, Susan from the design team here.  I have been inspired by the colors of October 2015 from our current challenge.   We will soon start to be creative indoors at our desks.  Here, in September, we are heading towards the amazing colors of autumn.  I've decided to show you a card that is easy to make. I have been playing with my alcohol inks on the bottles and on the jar for the paintbrushes.  The brushes are cut out and arranged behind the jar.  My background is coloured with distress inks and I sprayed with water to blend the colours. I have chosen a nice stamp that fits perfectly as a header. I have used Rubber Dance Stamps Stitch & Frame , Vintage Ads and Artist Plate Tim Holtz Apothecary Bottles and Writing Desk Dies Alcohol Ink Bottle and Raspberry Distress Ink Antique Linen, Crushed Olive, Barn Door, Mustard Seed, Carved Pumkin and Ground Espresso. Archival Ink Black Soot...

Mini File Folder Album - Vintage Style

Image
Hello, it's Anita from the Design Team here today. If you follow the blog you perhaps remember that last time I promised that I would show something cool you can use the homemade ephemera on, and here it is: For the first time (and maybe the last time), I have filmed the album page by page, pocket by pocket, so that it is possible to see all the details without having to look through 1495 pictures .... LOL I have used colors from the current challenge .   This month Rubber Dance are celebrating 2 years of challenges so you can select one of 5 colour options for your make this month.  I choose October, just because I want to make a vintage mini file folder album. Here is the video.  Find yourself a cup of tea or coffee and soak up the inspiration to create your own album using Rubber Dance stamps.  It was great fun making this album and I could not stop.  I have plans to create many more! The stamps on this project from the sets:...

Make Your Own Colouring Book

Image
Klikk her for å se innlegget på norsk (post in Norwegian) Hello.  Welcome.  Gail from the design team here today.  Have you seen all the colouring books f or adults?  I had a thought.  I have paper, ink, stamps.  I can make my own pages to colour........ I used Textured Feathers stamps and the colours for the March 2016 chall enge .  This month it's two y ears since Rubber Dance started its challenge blog and there are five of the previous colour schemes to choose from if you want to join this month's challenge I stamped the feather on paper Then I used the solid feather to stamp the colour into the outlines.  Quick and easy.  I used an orange sharpie to colour the feather shafts Here I am colouring the background and le a ving the feathers white.  I stamped the small dot stamp in or ange and coloured the background green.   Time to make something with these colou red p...

CASology Challenge #214: Beach - 1st Card by Bibi

Image
This week's cue word at the CASology challenge is BEACH - one of my favourite words!  I love the beach, I love the view of the sea, I love the salt air in my hair (and nostrils), I love collecting shells, stones and other treasures from the beach, and I love beach stamps and beach cards. That's why it says "1st Card" in the headline, as I'm sure I will be making more than one for this challenge! (Edit: And I was right.... my second entry is here - on my brand new blog!) I stamped the three nautilus shells with Archival Coffee and coloured them in with Inktense watercolour pencils (baked earth and sun yellow), blended with a waterbrush. The text stamp is also stamped with Archival Coffee, it just looks a lot darker on the photo. Sun stamped with Distress Ink (fossilized amber) and coloured in with the same Inktense yellow as the shells. Top panel mounted on a slightly larger panel in matching yellow/orange on a white card base. All stamps by Rubber ...