Posts

Showing posts with the label donna gray

Zendoodled Bunny by Donna Gray

Image
Hi everyone, It's Donna here today and I have long admired the absolute stunning artwork by my fab teamie Melina, especially her Zendoodled creations so I got to thinking if I could do that too. As I was thinking this the  Bonny Bunny  stamp set caught my eye and got me thinking....what if..... The  Bonny Bunny  stamp is ideal to try as it's quite an 'open' stamp so plenty of room to practice your doodling on. I stamped with black Archival ink on some thick card. I used a black fine liner pen for this, make sure the nib is as fine as you can get although you can doodle with varying nibs but for the finer stuff this is more controllable I found. So here I started the doodling, I had no plan in my mind, just doodled whatever patterns came into my head. Some more doodling....such fun!! You can see how the empty spaces are getting nicely filled up now. Nearly finished, just a few more doodles to do now..... Once I ...

Simplicity Sunday - A tag by Donna Gray

Image
Hi everyone, It's Donna here today with a simple tag for Simplicity Sunday! I used one of these small greyboard  tags  covering it with a coat of  black Gesso  to create a chalky background. I seem to be in love with creating with black at the moment! I wanted to make a rainbow as I had an idea to pair it up with the clouds from  Whimsical Summer  (which I use soooo much). Now when I was at school....yes I still can remember that far back.....we were always told there were seven colours in the rainbow but now it seems to be six?! Apparently some people do not count Indigo as a colour on the spectrum, anyway so I decided to create a rainbow with the six colours then ;) The rainbow was created by using Zig Clean Colour pens on a piece of water colour paper in an arch shape and then cut out and adhered to the background. Next step was to take the bird and clouds from  Whimsical Summer , colouring them with the Zig pens and then fussy cuttin...

Tutorial Tuesday - Your charming smile - A piece of hanging art by Donna Gray

Image
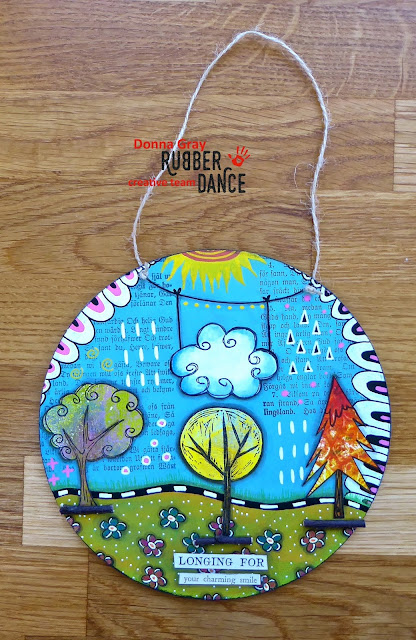
Hi everyone, It's Donna here today with my current obsession which is to create a piece of art you can hang on your wall ;) For my creation I used the middle sized That's Crafty!  MDF Round  which is 6 inches in circumference (yes, sorry I still work in inches as I'm very old)  Here is the MDF Round already to be painted with a selection of  That's Crafty! Multi Surface paints  which cover absolutely everything so there's no need for a coat of Gesso first. The blue was used for the background and the green and orange combined for the grassy hill. I pulled out 4 sheets of Gelli printed paper from my stash and four tree stamps from  Carved Whimsy Wood ,  Whimsical Summer  and  Whimsical Winter . I stamped these onto a mixture of the papers with black Archival ink, fussy cut them out and put them to one side for later. I wanted some writing in the background so I used the  Old Book Page  stamp and a li...

Simplicity Sunday - A Simple Tag by Donna Gray

Image
Hi everyone, It's Donna with you today to show you how to make this simple tag with only 3 stamps ;) I took a size 8 manilia tag and swooshed it through some diluted Distress Oxides on my craft mat (I used a brown, orange and grey). After it was dried thoroughly I then used some more brown Distress Oxide and a  That's Crafty! Mini Stencil  to create the cogs effect you see. I just wanted it to be subtle and not over power the main stamping. Next step was to use this wonderful stamp called  da Vinci Body Sketch  and stamp it directly on the tag with black Archival ink. I added a little shading around her with a grey Zig Clean Colour pen but nothing else as I wanted the background to show through her making her almost transparent. I then took the little heart that hangs from the tree in   Whimsical Summer , coloured it with a red pen and adhere it to the stamped figure. Then using a dots stamp from the  Textured Feathers  set I stamped t...

Technique Thursday - Carving a background stamp by Donna Gray

Image
Hi everyone, It's Donna here today and I'll be showing you how to carve your very own background stamp. Sounds scary? Not at all, I'll show you how to and then you'll all want to rush out and try it!! I thought it would be a good idea to show you all this technique as this is how  Carved Whimsy Wood  was created originally and then Bibi worked her magic to transform my carvings into that stamp set....clever huh :) Warning - Photo heavy post! These are the products I use to carve with. The pink block is real rubber and carves like a dream. The blue block is actually a vinyl material but this carves like a dream too and is a lot cheaper but it's a bit harder to get hold of. The stamping quality on both is exactly the same I've found. This is the tool I started out with and it's perfect for a beginner. I highly recommend this  stamp carving kit  if you want to try it for yourself. It's not expensive, you get the tool and rubber an...