Posts

Showing posts with the label design team

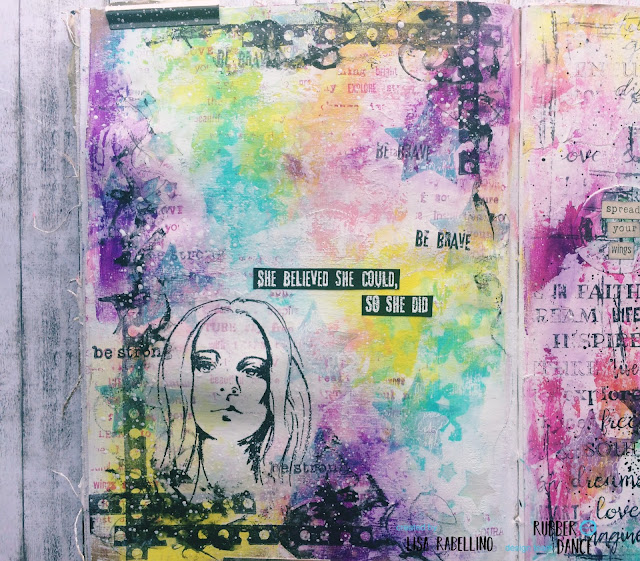
Believe Art Journal Page
Image
Hi  dear friends, Lisa  today to share with you this art journal Page playing with some acrylic paints and Rubber Dance Stamps, of course! I started by brushing on the background some acrylic paints, after I dabbed a baby wipe to remove some color and create more texture. I  let it dry and I brushed a little bit of white paint only in some points to create white spaces. After I stamped randomly some borders from Grungy Borders set and Mix A Sentiment stamp with archival inks.  On a piece of White collage paper I stamped the girl from new stamp set This Is Me and I glued it on the page with gel medium. Then I used the sentiments from the same stamp set with white embossing powder on a black cardstock and I chose some words to add to my page. Finally I made some marks with black watercolor pencil and I added splatters with white liquid paint. I used these stamps  from Rubber Dance Stamps shop: This Is Me Grungy Borders ...

Grungy Swirls ATC with Antique Botanicals Flower

Image
Hello friends!  Mary here with a fun ATC project I made using 3 awesome  Rubber Dance stamps, some embossing powder, cheescloth and Scribble Sticks.  I made a quick video of my process.  I hope you enjoy! Here are some close up pics of the ATC: Here are the stamps I used: Mix A Sentiment #1 Grungy Swirls Antique Botanicals Thank you for coming here to see my process and I hope you got some inspiration for your own projects!  Happy Crafting! Mary xoxo Find me on YT, IG and FB as Motley Mixed Media.

Inspire, Create, Dream: Art Journal Page by Lisa

Image
Hi dear friends! Lisa today to share with you my new art journal spread....Inspire, Create, Dream.... I started with a little collage of patterned papers, then I brushed white gesso to blend the papers into the background. So I took my favourite watercolors and I colored my page with pink, blue and yellow leaving some white spaces to give more brightness to the page. Then I used stamps from Grungy Stuff , Grungy Borders and Mix A Sentiment #1 with archival inks. On a piece of watercolor paper I stamped some flowers and leaves from Loose Florals #1 stamp set and I colored theme with watercolors. On a piece of black cardstock I stamped some inspired words from Journal Words set and I embossed with white powder. I made some splatters with white liquid acrylic, I let it dry as well and I glued my paper embellishments. I used a black watercolor pencil around the inspired words and as final touch I made other splatters with gold watercolor Here are th...

Welcome Our New Design Team

Image
Hello Rubber Dance fans.  Gail here today to and I am so excited to introduce our new design team.  We had so many applications from so many wonderful artists.  A huge thank you to everyone who applied.  Susanne had a wonderful time looking at all the applications and a nightmare whittling it down to a lucky few.  So much so that she didn't whittle so much LOL.  Before I introduce the team we'd like to say a special big thank you and farewell to Majo and Evelyn .  Your arty creations have been amazing and inspiring.  We wish you all the best and hopefully you will continue to share your wonderful projects with us.  Thank you for being part of our team ladies. Now, let's welcome the awesome new team for March to August 2020!! It's an amazing group of crafty ladies, many of whom I am sure you know, and we are proud to have them on the team and are looking forward to seeing all their arty creations with Rubber Dance stamps. Check ...

Welcome our new Design Team

Image
H ello my dear crafty friends!!! Susanne here today and I am over the moon excited to share some news with you! When I decided to accept Bibi's offer to take over her company I couldn't imagine what a lucky person I would be. It makes me more than happy to run this company, to design stamps, to press stamps and to create with my own stamps. I still cannot believe that this is real. Thank you Bibi for this opportunity!  Thanks everyone for all your support!  And thank you for all your wonderful applications to our Design Team Call! It was so hard to choose!!! Before I introduce our new members  I'd like to say a big thank you and farewell to: Anita Donna  Sue   Debs Thanks that you've made so many wonderful and artsy creations with our stamps! Now let's welcome our fabulous Design Team for the upcoming term from March 2019 to August 2019!   I am super proud and happy that I can work together wi...

A simple tag with crazy flowers

Image
Hello Everyone, Debs here with a quick and simple tag using some of the wonderful new stamps just released in the shop . 20 % discount till 31st of October!  I cut out a tag shape from heavy Mixed Media Paper and stamped my elements  I heat set the ink to stop it bleeding, and once it was completely dry I wet around the stamp elements with clean water.  I then added Watercolour paint (Sennelier) around the elements forming the background. I was careful not to go over the edges as I wanted to keep  The flowers clean. Once this was dry I added some distress ink here and there for more interest. I spritzed and flicked (first seen by Tim Holtz) with clean water which reactivates both the paint and ink giving interesting results Moving onto the flowers and leaves, I used Mermaid Markers (Jane Davenport) to add colour. I keep a pot of clean water and paper Towel close to hand to clean up any splashes of paint on the white. If you a...

Flutterbies by butterflies

Image
Hello Everyone Debs today here with a birthday card I made using the fabulous Butterfly Trio. Using Vesafine I stamped the 3 butterflies and then sprinkled Embossing Glitter in 3colours and heat set it to bring out the sparkle. You can just see it sparkle in the photo below For the background I used my favourite medium of the moment, which is Sennelier Watercolours. I first spritzed the page with water and then loaded  my brush with colour. As I touched the page the colour exploded onto the paper whooshing around. I love how the colours run round the page chasing each other and blending together. Of course you need to be mindful of what colours you use, as mixing any combination of primary colours will make brown. Of course if that’s the colour you want, you can mix some beautiful shades of brown, but if browns aren’t what you want, don’t mix your primary colours of red, blue, and yellow. I dried the page thoroughly and then added black around the edge...