Posts

Showing posts with the label altered art

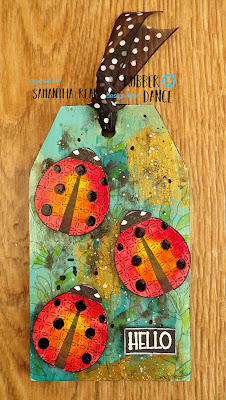
A Loveliness of Ladybirds by Samantha Read
Image
Hello, Samantha here today and I have a short tutorial showing how I altered a cheap wooden tag in to something pretty. Did you know a group of ladybirds is called a Loveliness - how perfect! It was my first time using the Things with Wings stamp set for these ladybirds, I chose to colour them in the traditional red colour but I think they would great in any colour, maybe seven, all the colours of the rainbow.... This is how the wooden tag and ladybirds began. I painted a couple of coats of gesso before adding three colours followed by the gold. I then knocked back the brightness of the colours by using walnut ink and stamping a leafy background for more details. I coloured the leaves and ladybirds with watercolour and white embossed the sentiment on black card and adhered them all in place. To finish I added some brighter coloured red ink to the ladybirds and some glossy accents and finally some spotty ribbon. Here are the stamp sets I used: Things with Wings Sketchy Flowers #2 and Sk...

Bucket of Fun by Samantha Read

Image
Hello, Samantha here today and I'm so happy to be sharing with you this fun decorated bucket project. It could very easily be personalised with names and dates etc. to make a wonderful gift or keepsake to remember a special journey with someone special. I began with a plain white bucket and card. I stamped the images using a 300gsm card as a firm card is needed or the images will flop and curl. To make the insert for my bucket, I cut a circular piece of card and snipped in to the edge all the way around by 5mm, this lets the circle sit snuggly in the bucket. I coloured my Whimsical Summer and the lovely rainbow from What a Girl Wants stamps sets using watercolours. Whilst my images were drying I gave the bucket a couple of coats of white gesso, and then a final couple of coats of an off white paint and splattered the same watercolours all around and then added some lustre spray for a little contrast. Now this is a little fiddly, I added wire to the back of the stamped images and th...

Altered Playing Cards - In the Woods

Image
Hi there! Susanne writing today and I am sure you can imagine how excited I am about Rubber Dance moving to Germany, moving into our home!!! I am so proud and happy that Bibi asked me if I'd like to take over her company! Without Rubber Dance I'd have never become such a passionate stamper! I have been designing for Bibi since 2014. It is the best team I've ever been on! I am working very hard at the moment to get everything ready in the new web shop! I hope I am able to reopen by the end of next week! Until then have a look at our retailers page: http://rubberdance.blogspot.com/p/retailers.html For today I have two altered playing cards to share with you. I used our Carved Whimsy Wood stamps set. I used watercolours for the background and oil pastels for a more mixed media look. I also have a video for you! Enjoy! Thank you for watching today! xx Susanne Supplies: Rubber Dance Stamps: Carved Whimsy Wood Old Book Page Others: Mijello Mission Go...

How to create a Mixed Media Acrylic Clock

Image
Hello Everyone, Debs here with one of my How To projects, and this week it’s working on Clear Acrylic, which can be tricky, but so effective! I apologise in advance that the photos are not our usual quality due to the Clear Acrylic which reflects the lights and blurs the focus. So first, using the backboard I gave it a heavy coat of crackle paint and let it dry, then added Antiqueing Cream in Patina all over to fill in the cracks. To apply the cream,  rub in all over the surface you want filled and let it dry. Then with a damp but not wet cloth wipe it off. The idea is to leave the medium that has sunk into the cracks but wipe it off the surface. It can have a really aging effect, but is not permanent so I used a gel medium to seal it once dry. This also gave a great surface to stamp onto. Remember this is your very last surface and so acts as your background. I stamped the leaves all round the clock at the edges and then heat set it. Now this clock comes...

Altered Tag Box - Tutorial

Image
Hello Everyone, Shilpa here, Confession-  I am a scrap stash hoarder. And it was piling up... I had to take action :) I made bunch of Tags with bigger size papers and  which can be used for my future projects. and there was empty Dove Soap box... which I wanted to upcycle!! I removed box flaps.  On tissue paper, I stamped text using Rubber Dance Art defined stamp and black archival ink. And adhered it to whole box using Mod Podge glue. I decided to use acrylic paints and as a primer, I applied white gesso to the surface using sponge. It covered some part of surface and gave beautiful texture. I chose blue and green acrylic paints. I applied them on the box using sponge again... I love that effect. On another paper, I applied acrylic paint (DecoArt Razzle Berry), let it dry completely. Onto that, I stamped these beautiful hearts using Rubber Dance I heart Art stamp set and black archival ink and cut them out. ...

Altered Playing Cards - Video by Susanne

Image
Hi my dear crafty friends. I have a video to share today for these altered playing cards. My kids got those cards twice at a promotion of our local discounter. They are meassuring 8cm x 12cm. I covered them with gesso and started to play. Enjoy the video! Here are some detailed images: Thank you for stopping by today! xx Susanne. Supplies! Rubber Dance Stamps: A little Birdie I Heart Art Da Vinci Woman 1 Wanna Bet? Da Vinci Woman 3 Round in Circles InLinkz.com Others: Gesso Acrylic Paints Faber-Castell Oil Pastels Stencils StazOn Ink Archival Ink Tissue Paper Collage Medium