Posts

Showing posts from August, 2021

Mixed Media card by Lisa

Image
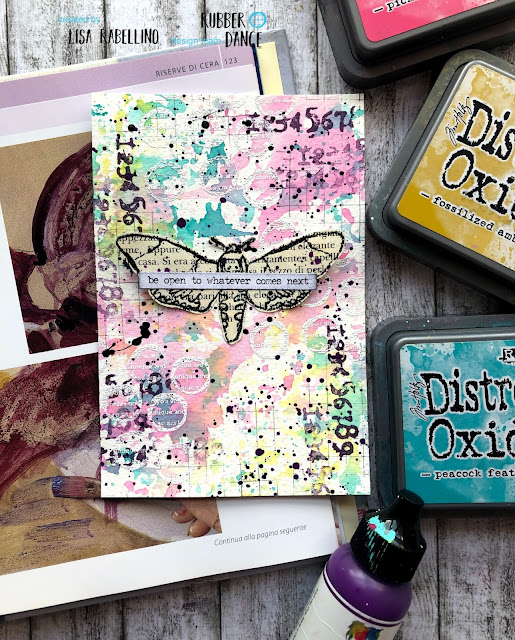
 Hi dear friends!  It's Lisa today from Rubber Dance Design Team and I'm sharing a simple mixed media card for you. I started by doing some white embossing on a piece of watercolor paper. Next I added colors with Distress Oxide to the background to get a watercolor effect. I stamped some marks with archival inks with Mixed Media Marks stamp set. For the focal point I stamped a moth from Inky Friends stamp set and I added a sticker for the sentiment. As usual I added splatters with black liquid paint to give more interest to the project. I used these products from the shop:  https://www.rubberdance.de/single-stamps/grungy-circles/#cc-m-product-14064938833 https://www.rubberdance.de/big-sheets/mixed-media-marks/#cc-m-product-14348286233 https://www.rubberdance.de/big-sheets/inky-friends/#cc-m-product-14383086833 I hope you enjoyed my mixed media inspiration for today! Hugs, Lisa

Make your mark by Angie Coomber

Image
 Hi arty friends, How are you? Angie here with a quick tag for you, I hope you like it. I started by doing some clear embossing on a white tag. Next I added some blue shades of Distress Oxide to the tag. I stamped the face directly onto the tag and added  the numbers around the edge. Next I stamped some marks with Distress Oxide inks. As usual, I then got carried away with mark making, doodling, and a quote - and forgot to take photos! So here is the final result. Until next time, Hugs from Angie x Stamps used:  Carved Collection 1 Pencil Marks 1 This is me

Bullet journal with Lace Doilies by Farida

Image
Hi lovelies, Farida here It's time to create the next month in my bullet journal. This year I started to do it as simple and practical as needed. But nevertheless I have fun creating the month's page. So today.  I started with cutting down a piece of white paper to the size of a journal page. Next I used some ink pad colours. I thought about what colours match to the month of September and fall....and as it sometimes called 'golden September' I decided to have some darker colours on the background with a splash of gold or on this case yellow instead.  After putting down some colour onto the background I started stamping and gold embossing the lace doilies . I love how this page turned out. For the next step I glued my paper onto my bullet journal page and stamped some extra doilies on the opposite page to match.   Last but not least I added the month's name and the calender with a black pen and afterwards added some golden details with a golden acrylic pen. 

be kind to yourself | elegant card with grungy butterflies by Dunja

Image
Hej Rubber Dance Friends, it's Dunja from the Creativ Team here today and i'm sharing a little bit of elegant card with you. As you know, i love Gelliprints, it's the same here as usual :)) The cardbase is a background. I've used the cut outs of some alphabet dies from Alexandra Renke this time.  The stamps from Rubber Dance are the Butterflies. Butterflies are a must-have for me in my stash. So i grabbed two of them and like you can see, these are the same butterflies just in two different sizes. The bigger one is the  Grungy Butterfly #4  and the other one is from the  Small Grungy Butterflies  Stampset. I've done some heatembossing. The bigger one on a piece of white cardstock, the smaller ones on Vellum. Hope you like the card as much as i do. :)  Happy Stamping, till next time Dunja   ( Blog  |  Instagram  |  Facebook )   Rubber Dance links: Website Facebook Pinterest Blog Instagram YouTube      

Having a Whale of a Time by Dot Leathbridge

Image
Hello everyone, It's Dot here with a tutorial for you showing how I made a card using the Whale Wishes stamp set.  A friend sent me a pic of some whales playing in the bay at my old home town  and I thought it would be a great idea to make a card with whales on it. All the stamps are from the one set. Are you ready to see how it was created? Here we go. The first thing that I did was to add some Distress Ink to a gel plate and spritzed it with water. This is how the print turned out. As simple as it is, Distress Ink can give you some wonderful effects on a gel plate, which you can vary according to how much water you add. I made a quick mask using photo copy paper and added some leaf detail randomly around the edges of the print using Oxides. I wanted to add a subtle layer of bubbles in the background by using the ghosting technique but it didn't work as well as I would've liked.  Plan B came into play!  I added some colouring to the  faint images of the bubble stencil. I

Art Journaling with Birdies by Ellie Knol

Image
An art journal page from me today, a happy color one.  I started by scribbling with Neocolor II crayons vertically, then added white acrylic paints with a brush to mute them and partially overlap the colors, scribbled in it with the same crayons.  After letting it dry I stamped in the background and onto a separate white cardstock, fussycut the birds and butterflies, colored them and adhered them to the page.  Only step left now was adding color to the images and some journaling words.  See you next time!   Rubber Dance Stamps: The Rubber Dance Webshop Textured Birds Antique Botanicals Pencil Marks #1 Mixed Media Marks Mix A Sentiment 1

Simple Mixed Media by Kate

Image
Hi, Kate here. I have today great tutorial for all beginners who have fallen in love with Rubber Dance stamps and who are afraid of mixed media. Let's make something beautiful and so simple together. Stamps which I used: Inky flowers Grungy butterflies Other material: - watercolour paper, embossing ink, white embossing powder, clear embossing powder, Versa fine onyx black ink, embossing pen, scissors, 3D foam tape, sewing machine, Distress inks - Peacock feathers, Kitch flamingo, distress ink tool, card base Have a nice day Kate

Atc´s Moths

Image
  Hi, I'm Vero (@ Vero.kt) and I welcome you to today's inspiration. How's everybody ? I've been playing with     Mixed media marks   Grungy Stuff   ,   Round in circles   and    I nky Friends   to create a  colorful Atc´s , that I hope you like. Very easy to do, we started. We cut watercolor paper to a size of 2.5 x 3.5 inches, if you prefer to work in cm, 6.4x8.9. In my case, the paper is smooth and hot pressed, and I color the backgrounds with pigments. When the backgrounds dry (we can speed up the process with a heat gun) we will add texture and depth with different inks, in my case I have used  distress oxide.To start, I choose a stamp from the  Mixed media marks  , apply the inks, spray water, and stamp, (I'm not looking for definition, I'm looking for a watercolor effect, watery). Help myself with the dryer and go back to stamp with different inks, to continue adding depth and texture. I choose one of the stamps from the  set,   I nky Friends  stamp it  o